


proast
-
Posts
27 -
Joined
-
Last visited
Content Type
Profiles
Forums
Events
Posts posted by proast
-
-
Makes sense. Cheers.
-
I have been using a Sena 10C Bluetooth camera for years now. I've loved it, but it is on its last legs. The battery has no life left and I think there's an internal memory error. I've been waiting for Sena to release the updated version, the Sena 10C Evo. Sena is about two years late on the Evo release, so I quit holding my breath on getting a replacement from Sena. When I bought the 10C, I only wanted a 20S and opted for the camera headset entirely on a whim. After buying it, I've been very happy with the camera. While I use it on trips, ninety percent of the time, I am using this helmet camera as a "dash" camera. My thinking is that if I am run off the road in a hit-and-run, my wife can tell the cops to check the camera for who the other party is. So I was looking for a trouble-free solution where I could get video from the front of my motorcycle as well as the rear. I also wanted something that would be powered by the motorcycle and not have a limitation of two hours as so many "action" cameras have before the battery runs out. Lastly, I wanted something discreet so I wouldn't have to worry about it being stolen. After doing a lot of research, I decided on the HaloCam M1. https://www.amazon.com/dp/B07D371DRF Cost was only $179.89. I highly recommend it.
What attracted me to the HaloCam M1 was a couple things. First, it has 1080p cameras on the front and rear. Many of the older or less expensive cameras are only 720p. I don't know much about the cameras, but I do know that Sony is a good name brand, and they are using Sony cameras in the M1. That's a plus. The other big plus in my mind, was the wi-fi capability. Trying to aim your cameras without being able to see what you're doing in real time is a pain. The HaloCam M1 comes with a nice app for a smartphone that allows you to see what the cameras see in real time. You can also download your videos without touching the DVR unit, and even make changes to the settings from the app. It's slick. I was impressed with the HaloCam M1 from even the time I opened the box. The outside isn't glitzy. It actually has a touch of class to it, IMHO.
When you open the box, you'll see the DVR unit along with the two cameras and the manual switch neatly arranged. To me, everything looked professional, not cheap. This was promising.
Lift that packaging up and you'll see the cords neatly tucked away underneath. They use a short cord attached to each item like the cameras with a longer section to run from that camera to the DVR unit. Everything is color coded. You can't mess this up in the installation. Even the color coded plugs have only one way to plug them in. You can't mess it up. And they include heat shrink tubing that you can use to guarantee the connections are waterproof. They have thought of everything.
Installation is straight-forward. Mount the front and rear cameras. Mount the GPS device they include. And mount the manual switch. Then find places on your motorcycle to hide the wires and plug them into the DVR. The last thing is to find a good power supply.
The front camera is mounted on the black "lip" under the headlight. I doubt you can see it.
The rear camera is a little more visible...but I doubt you'd notice it without it being pointed out.
You'll want a power connection that turns off when the ignition is turned off. Otherwise, the camera will continue to record and you'll run your battery down eventually. I connected mine to the tail light circuit. I have a BMW, and there's a lot of concern about the CANBUS system having errors when you do this. I had no problems with mine. They also include a USB power connector that you can use to power the camera. Again, very well thought out.
One note. The DVR does not have any built in memory storage. You'll need to supply your own SD memory card. Use the highest speed memory card you can buy for this, since you're recording from two cameras simultaneiously with sound. I used a Class 10, U1 card and the images were pixelated. With a Class 10, U3 card, all seems fine.
What is it like in use? I've attached three screen captures. The rear camera shows a white vehicle merging behind me on the freeway. If you look closely, you can see another car to the side of it.
The next picture shows the blue car rapidly gaining speed. Although there is a large open space to merge into, it is clear he is not merging there.
The last picture shows the blue car cutting in front of me. BTW, the only reason he had that much space to merge into, was that I wasn't going to "fight" for my space and I backed off. Right after he moved in front of me, he cut over two more lanes in heavy traffic. If there had been an accident, the video shows a seamless capture of his actions from the rear camera to the front camera.
I haven't tested this yet , but if there had been an accident, the camera has a vibration sensor that locks the video so it isn't overwritten.
This is not an "action" camera, yet one of the sales people at Cycle Gear mentioned that the video I showed her was as good or better than her GoPro. I don't know if I'd go that far. But it is good.
As a "dash" camera though, I'd rate it as exceptional. The quality of everything is excellent, and the price is great.
I have only one nit-pick... When you mount the cameras in their mounts, they are still a little lose when the screw is tightened all the way. The "fix"...just use another washer on the inside of the two arms of the mount that holds the camera and it'll tighten just fine. That is really minor. You'll see what I mean when you mount yours.
Lastly, I have to make a comment about the HaloCam customer service. It is exceptional. I notice that of the previous reviews, one person had issues with his camera. I did too initially. I contacted them and they were outstanding in resolving my issue. I don't know when I've had better customer service. They definitely stand by their product.
Chris
Interesting Review Chris / Daboo.
Except for the mention of the Sena ... it appears to be worse for word the same detailed review as Diana Rypkema on Amazon who also had a blue car race up behind and cur in front of her. What's the connection?
-
I installed FJR1300 Foot Pegs.
Ebay $12 Aussie delivered ($8.88 USD). I think I got the inspiration from this thread or elsewhere on the forum. Thanks goes out to whoever it was for sharing.
Simple to install....remove the OEM split pin and remove and replace pegs.
They are quite a bit longer and a bit wider but not ridiculously so.
Plus with the rubber top, hopefully will grip my boot a little better in wet riding...have had a few slip off the peg moments. Especially hope they just reduce a little bit of vibration that has just started to creep in in the past few thousand km's ( just done 27k km).
I reused the OEM centre pin, split pin and spring as they all looked much more substantial than the new ones.
Noticed when I went to remove the original right side peg, there was no stem (grind away... not sure of the proper name). Was it only ever just on the left (if so why?). Had it simply come off? Is it there on other 2015 MT-09 TRACER's (FJ-09)? Interested to hear others setup....


-
Sydney Australia.
-
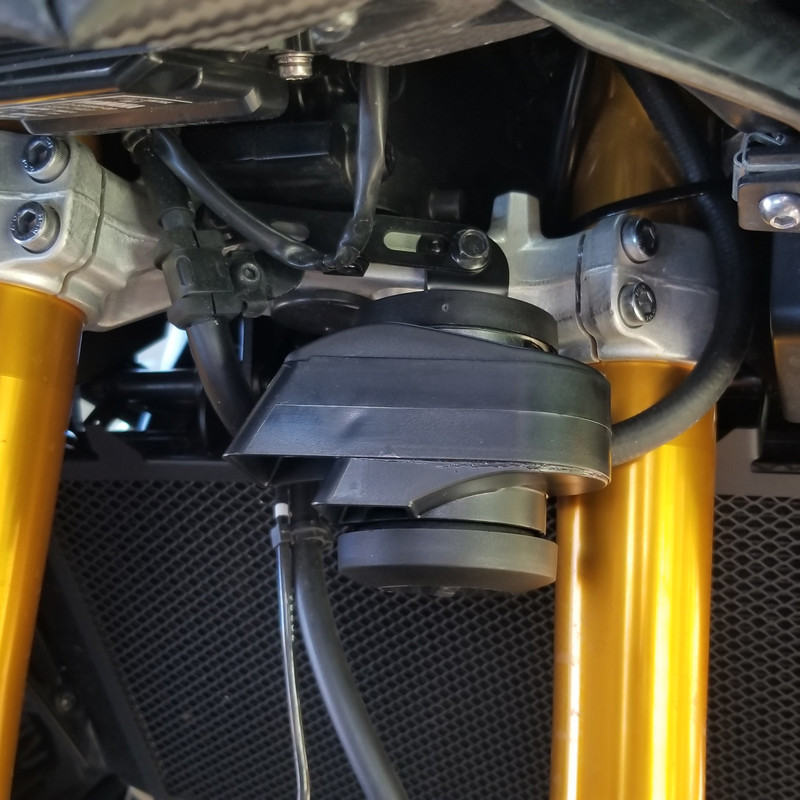
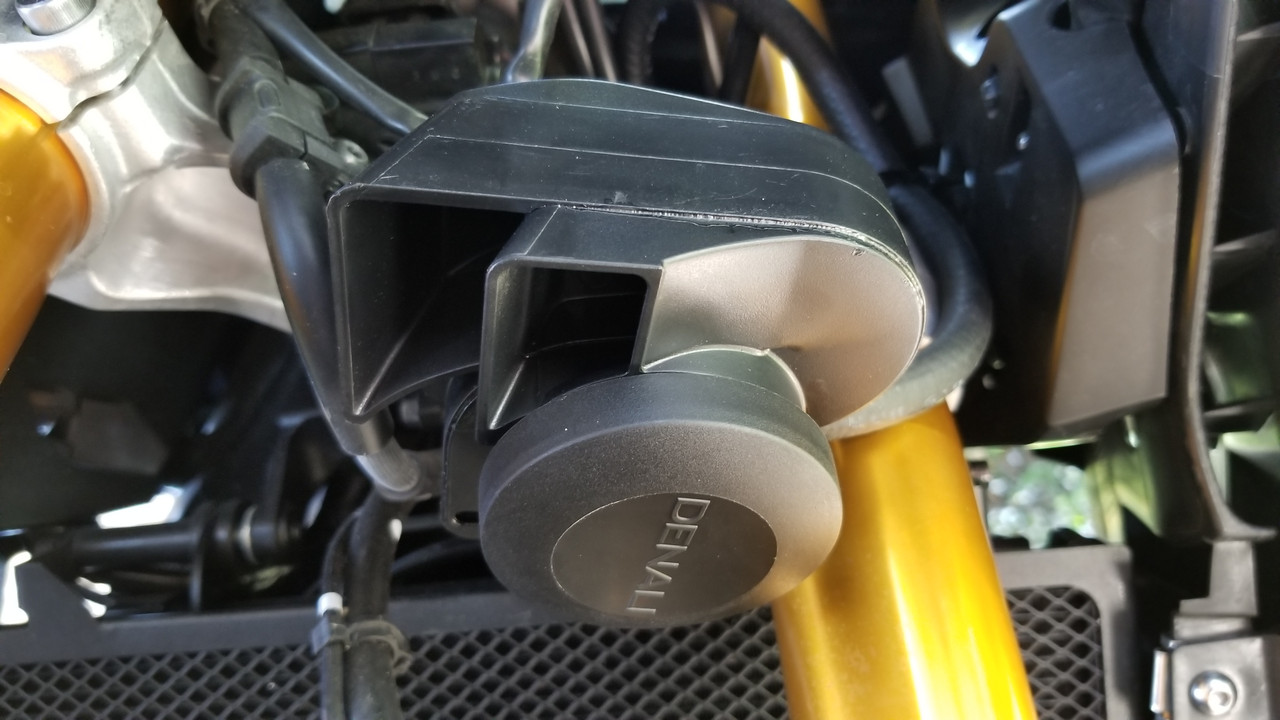
I did the same thing around 9 months ago after reading about it in another thread.Finally received, and installed, my Denali SoundBomb Split. While I installed the horn in a manner similar to how washufiddyfo installed his (after he moved it), although I installed the compressor in a less "problematic" way. For the horn, I was originally going to bolt the horn directly to the bracket attached to the lower triple-clamp, exactly as washufiddyfo initially did...but, I (as did he) noticed that the lowest part of the horn was lower than I'd expected, and, not wanting to damage it, I decided to play around with a few different options.
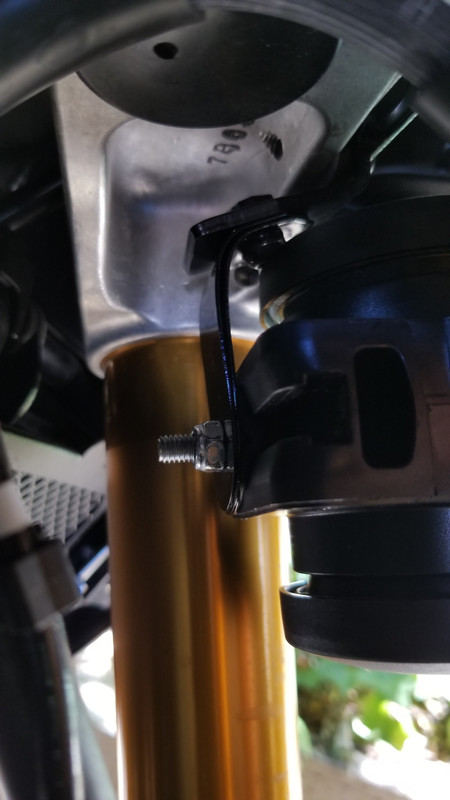
In the end, here's what I came up with. As seen in the first three photos, the OEM horn is bolted to a bracket (technically, two identical pieces), which, in turn, is bolted to a second bracket, which is bolted to the lower triple-clamp. I removed the OEM horn, removed the 2-piece bracket, then bolted the 2-piece bracket together at both ends, and bent it/them into an L-bracket. I then bolted the L-bracket, upside-down (as seen in the third photo), back to the bracket attached to the lower triple-clamp. After that, I attached the hose (more on that in a second) to the horn, and finally bolted the horn to the upside-down L-bracket, with the horn facing down, and the hose pointed to the left side of the bike. I routed the hose up through the faring, over the top of the radiator, down the back side of the radiator (away from the fan), under the Engine Guard bolt (indicated by the red circle in photo 4), and into the compressor.
Regarding the air hose, since I was originally going to installed the compressor, I realized that the length of hose included in the kit would be way too short. On top of that, the material it's made of isn't exactly welcomed by the high temperatures, and, since I was planning on running the hose right through the engine area, the hose Denali includes would NOT work. So...I went on the hunt for some high-temp, high-pressure, hose. What I came up with was found at AutoZone - 1/4" ID Fuel Injection hose, with a SAE J30R9 rating (working pressure 100psi, burst pressure 900psi, working max temp 275F, intermittent max temp 302F). The OD is a bit larger than the included hose (the wall thickness is twice as thick), but easily fits inside the horn. Unfortunately, even though the ID was the same as the included hose, it doesn't stretch as easily...so, out came the can of air freshener. A "trick" I learned when installing aftermarket grips years ago (which I've since used with every pair of replacement grips), is that air freshener spray works just as good, if not better than "soapy water", plus it dries (actually, evaporates) a lot quicker. A few "quick bursts", and the hose slid on somewhat-easily enough.
Speaking of the compressor, as you can see in photos 4 & 5, I attached the compressor, using two cable zip ties, to the middle bar on my Givi Engine Guard Bars. Next, I attached the wiring harness so that it's connected directly to the battery, to the original horn connectors inside the fairing (I pulled the connectors up, so that they wouldn't "hang"), and to the compressor via the same route as the air hose. The line running to the OEM horn connectors runs down the right side (right next to the MCCruise cruise control harness), while the line running to the compressor runs down the left side, both inside the frame & under the gas tank. Lastly, I held the air hose & wiring harness in place using more cable zip ties.
After putting the bike back together, I gave the new horn a few "test bursts"...and I am VERRRRRRY pleased to state that the Denali SoundBomb is CONSIDERABLY louder...and more obnoxious-sounding...than the roadrunner-sounding "beep-beep" OEM horn. My only disappointment...and it's a minor one...is that I won't get to see the face of the person in front of me each time I blast it.


Same install for the horn but was able to tuck the compressor in under the tank.
Recommend using the Denali wiring loom...saves time and hassle.
I use it pretty much every time I ride...plenty of need/opportunity. And at 120db It's the loudest legal unit that still meets Australian Design Rules.
Got my bike serviced last week and when I picked it up I asked if they discovered my horn (was concerned it may have gotten in their way) and the foreman had had fun scarring the crap out of the apprentices in the workshop.
I would have to say that it is the #1 most important mod I've done. Has saved several potentially dangerous situations from developing through being deployed.
-
20k km on OEM Dunlop tyres.... must be a record. Would love to know how/what kind of riads and riding.
I put on a RoadSmart III rear on my bike just before a 1800 km trip and it performed great. I got 19,900 km (~12,400 miles) on the stock Dunlop without a puncture. About 1500 km into my trip, I picked up a finishing nail in one of the groves on the RS III that went all the way into the tire. I used a Stop-and-Go mushroom plug on it and it seems to be fine. My local motorcycle shop says they won't patch tires anymore (only plugs) because the inside of the tire is too oily to hold a patch. I don't know how accurate that is but time will tell with the plug. I'm not inclined to spend another $250 to buy and mount another tire so I hope this one holds for at least 20K km like the OEM tire.New Dunlop Roadsmart 3 tires. The amount of confidence this tire give you, is really high.

I got 13k on original Dunlops and was probably 1500km overdue.
Next set was Metzeler Roadtec 01...outstanding tyre while it lasted as the rear is down to legal limit now at 10k km...disappointed given the price tag and longevity claims...front still ok... so have just ordered a new Pirelli Angel GT.
I do 2/3rds commute 1/3rd tour... 20k km/yr in all...
-
Rocket Red....
Absolutely love the colour.
-
I'm at 23k Km... 21k of it in 12 months.. not sure what that is in miles.
TYRES.
Original Dunlops changed at 14k but was probably 2k Km more than they should have been. Experienced the front handlebar vibration that many people complain about but I thinknI had read on this forum that its nothing more than uneven type wear. Spot on. As soon as the new tyres went on...problem solved. Not impressed by the Dunlops at all....rubbish. Now running Metzeler Roadtec 01's and super impressed. Superb in wet and dry and hardly showing much wear with nearly 10k km on them.
CLUTCH CABLE.
Replaced at 21k km after it broke on the way home from work. 3 weeks for Yamaha to get one in stock. The new 02 part number at least...so doesn't have the wear point that plagues the 01 version. Life of cable will probably depend on what type of riding you are doing. My km are 2/3rds city peak hour commute in heavy traffic and lots of lane filtering and clutch action.
That's it from a maintenance view apart from 10k km services and I drop the oil and filter at the 5k km in betweens. It's one of the key reasons I went the Yamaha over say a Duc Mutlistrada... my relatively high annual km would be very expensive to run/service/maintain.... it's just so reliable and the Torque of the triple just makes it the perfect all rounder.


 , but if there had been an accident, the camera has a vibration sensor that locks the video so it isn't overwritten.
recommended long distance riding helmet??
in FJ-09 Tracer 900 General Discussions
Posted
I had the N87 and enjoyed it but upgraded to the modular N100.5 6 months ago. Have done 20k km in it and love it. The thicker cheek padding, the vastly improved chin wind deflector and especially the draw string neck roll which keeps both the cold and the wind noise out.. without earplugs it’s quiet unless you are riding with the visor up at around 90-100km/h where it has a slight whistle sound. I choose to ride with Alpine Motosafe ear plugs almost all of the time. They allow all the important sounds in and just cut the dB irritating sounds. The Nolan N-Com System transferred easily over from the N87 (made by Sena I believe) and it’s low profile controller tucks into a removable blanking panel so there it doesn’t stick out awkwardly like so many others I see. The helmet itself has been super comfortable on multi day (3-4 days) of 500-600km/day rides and the ability to easily open the chin guard/face and flip up with one hand on the go allows fresh air to flow.... I’m sure the Shoei Neotec II is also a great helmet and perhaps the pinnacle for many riders, however at 40%-50% more expensive, the Nolan reaffirms itself as outstanding on all measures.