


2WHLOZK
-
Posts
125 -
Joined
-
Last visited
Content Type
Profiles
Forums
Events
Posts posted by 2WHLOZK
-
-
You guys are making me homesick for my beloved Colo Rockies with all your Alps and switchbacks talk! 😀
-
 1
1
-
-
I've been eyeballing the Motech crash bars, mostly to mount hwy pegs to. I can live with the $203 for the bars, but man, they are really proud of the matching pegs & mounts....$125 for the mounts, and $50 for the pegs. Is it just me, or does $175 for a pair of hwy pegs seem outta wack?
Been scouring the webs for a set with sturdy mounts, priced within reason....nada. The problem seems to be Motech's 1 1/8" diameter bars. I've seen the universal peg kits, the mounts look flimsy.
Solid peg kits for 1" and for 1 1/4" are everywhere for much less. I'm half tempted to buy a pair of 1" and modify them.
Anyone know a source? TIA
-
2 hours ago, HGP61 said:
So many variables, weight of rider and loading, road surface and the pure enjoyment of a very flexible right wrist perhaps.
My last bike, a Honda CBF 1000 the rear tire went from looking legal (admittedly at a glance) to the wire cord showing through over a third of the circumference half way through a 200 mile day out. I had a very steady slow and smooth run home.
It's amazing, isn't it. I did the same thing on my Bandit 1200. I had recently replaced the front tire, the rear still looked pretty good at about 4500 miles (Battleaxe). Went for an all day mountain ride in Colo, was blasting 100+ mph in several areas. Thought nothing of it.
I stopped at the store on the way home, but on the way out I noticed a thick white stripe on the rear tire. It was a 2 1/2 inch wide area worn down into the cords, which were frazzled and coming apart.
I pushed on it with my finger, it was soft like a balloon. It gave me pause to think that I'd been ripping up I-70 at 100+ mph just minutes before. With only a few miles left to go, I limped all the way home on the stony shoulder of the road ~ 5 mph. I was totally expecting to be riding on the rim shortly, but somehow made it home. God was with me that day. Lesson learned!
-
 2
2
-
-
Installed Heli bar riser.
Adjusted chain (1st adjustment)
Changed oil to 20 w 50 for the duration of hot weather.
-
1
-
-
-
-
9 minutes ago, betoney said:
Careful, riding like that has been known to cause premature ageing. 😲
Ha, too late!...just had my 71st this month.
Still always riding 20 over the limit, though ! Cheers.
-
 2
2
-
-
On 7/25/2020 at 7:27 AM, huck said:
2WKLOZK, I had my bike flashed first, but as stated, this problem was not solved. The Booster Plug did solve it.
In regard to your question regarding flashing. I had a fairly extensive email conversation with Lars, at Power Plug who suggested that this unit was indeed a stand alone product and that one did not "Need" the flash. You may want to discuss this directly with the the power plug folks. I di, and found them to be very responsive and very thorough in answering questions. However, since I had the flash done first I can't reply with personal experience. Why not do the plug first and see if you are happy with the result. It carries a full money back warranty if you are not happy. You can get a list of what the flash does address. The flash does address several other issues, but you may not care about those specifics. Do give this a try, it really is easy to instal, and it really works.
I personally experienced a slight increase in milage. But, that might have been because I no longer needed to use higher RPMs in lower gears to try and overcome the stumbles.
I am not associated with this company, but I am a big fan.
Well, the Booster Plug went in today. After a three hour test ride I can confirm that the Plug has lived up to its claims, and has performed for me exactly as you described it did for you. This will likely be the best mod I'll ever do to my GT.
Thanks again for posting about it! Cheers.
-
2
-
-
Installed my Plug today, then went for 150mi ride. Temps in the low to mid 80's. Covered all the types of riding circumstances that I'm likely to encounter on any given day, for this time of year. Some expressway cruising, some open two-lane country roads, some super-twisties, and some stop-n-go in heavy traffic. I tested Standard mode and B mode today. Will sample A mode on the next ride.
I also made sure to include plenty of low speed, low-rev maneuvers like parking lot U turns, etc. These maneuvers especially (and even just pulling away from a traffic light at times, to be honest) needed some help.
I'm happy to report that the Booster Plug has solved my off-idle issues. I was just hoping for "some acceptable" improvement from the Plug. To my delight I got Major improvement. Now I have a smooth, linear throttle response from idle. The way it should have been from the factory, but wasn't.
I noticed slightly different results than Wintersdark got with his bike. I got smoother operation in partial-throttle situs too, like when short shifting or chugging along at walking speed. Additionally, I noticed less engine drag at full decel in the twisties. So that's another "plus" (at least for me and my modest riding "skills").
To be fair, I've only put ~ 2K miles on the GT so far. As I get to know it better I may find other fueling areas to improve. Who knows? But for right now I can say Mission Accomplished!
Oh, and the install was easy and I did not have to remove the tank, or even lift it at all.
Edit: I might as well mention that the bike no longer insists on keeping its revs a bit on the high side, where it always seemed happiest. It still seems just as happy up there, but now also content loping along at slower speeds in higher gears. An indication of improved, across-the board, partial-throttle response?
-
8 hours ago, betoney said:
Just wanted to share some info, previously I had mentioned that riders on other forums had great experiences with the booster plug. Here is a response from a bike tuner -
"Since these inline fuel controllers go in between the ecu and injectors, they can only rectify the injector pulse, but they don't know which map it's originating from. I have no experience with the Dobeck unit, but power commanders are impossible to map at low throttle settings because they are working on correcting the TPS responses, and that's why folks complain about flat spots and hesitations in low throttle settings.
Also, Fuel mappers are limited to that... mapping fuel. There are other controls that impact how the engine runs and responds. Timing is a big one. It can be changed with ecu flashing, and not with a piggyback unit. Likewise for secondary throttle mapping changes. My flash has a full complete rebuild of all these maps and they aren't even similar to stock. That's why the throttle pickup from closed is as smooth as it is. Good secondary mapping coupled with fuel cut delete, which is another thing piggybacks can't do. They also can't shut off the 02 sensors or pair valves / CEL lights, change the rev limiter, etc.Finally - fuel economy. With flashing, you can target individual cells all across the map, from idle to redline. When building a flash, I not only use a dyno, but also I ride and datalog extensively. the bike is hooked up with a wideband 02 sensor, and it's recording the relative afr's for each cell. because of this, I can change afr's depending on the use. light throttle is leaner than full throttle. I generally DO NOT autotune. In this manner, excellent fuel economy can be maintained. Piggypack units, at least the pc's, can be autotuned, but you need to know what you're doing, and it's more of a "batch" change than a cell specific adjustment. If you're just adding 8% fuel all over the place, well, you're not going to get the best fuel economy. Booster plugs are really bad for this, but if it's all you've experienced you think it's the best.
Technology has marched on, and the booster plug and piggyback fuel controllers that are "tricking" the ECU data have fallen by the wayside as ECU access has improved. Now we can go to the source of the data, and change it accordingly. We can't get stuck in a time warp. What was good a few years ago has been passed by with this new access. If you want to be good at tuning, you have to keep up. it's not easy, and I for one am constantly learning.
I hope this helps."If the Plug fails to perform as claimed, or I don't like some aspect of it, or if it's only a slight improvement but not worth the cost I can return it for a refund and consider an ECU flash.
That said, I have no complaints about fueling other than poor off-idle performance. I won't be tracking the bike, so the intricacies of deep tuning the ECU probably won't interest me (never say never, though) provided the Plug doesn't negatively impact performance in some unforeseen way.
Re fuel economy, the Plug people claim a decrease of ~1-1.5%. If accurate I'll be happy to pay that difference.
Bottom line for me is trust, but verify. Cheers.
Edit: Forgot to mention that I have the better part of 5 years warranty in effect, not sure if/how a flash might affect future claims (?) Just one more reason for me to try and avoid flashing, I suppose.
-
4 hours ago, betoney said:
On some other bike forums the booster plug gets a lot of praise. Let us know your impressions on how it works on the CP3 motor.
I will.
Probably will install the Plug Monday.
-
 1
1
-
-
11 hours ago, Clem Fandango said:
I just can't bring myself to potentially trust my life to a $4.50 peg from China made from melted down who-knows-what.
Yeah I thought about that before ordering them, but realized the Tracer is not an adventure bike, and that I won't be standing up ever. Also expected them to be cast, not forged like a quality peg should be. Risk/reward ratio seemed acceptable. Cheers.
-
1
-
-
4 hours ago, Wintersdark said:
I just got mine as well, but haven't had time to install it yet. Definitely interested in how it works for you!
I'm pretty excited about it, if it works half as well as claimed I'll be thrilled!
-
On 7/29/2020 at 10:24 AM, KillEmAll4u said:
Yes please let us know the outcome. I'm using an air hawk seat cushion pushed up against the tank with minimal air which does a fair job at eliminating the slope and making the stock seat more comfortable but love the idea presented here and wish to try.
") Thanks guys.
Thanks guys.
Just got back from 3.5 hour ride, with only a quick stop for gas. No complaints, I could probably do 5-6 hours without an actual break.
Before any seat mods, within 15 minutes I was already uncomfortable. After ~ 40 minutes all I wanted to do was get off the bike. The longest I would ride was 1.5 hours, and for the last half of that I couldn't wait to get home. No joy in that.
Today's ride was the first time I felt like the bike was an extension of my body, not focusing on being uncomfortable the whole time.
Now I just need to install my Booster Plug that came today! Cheers.
-
3
-
1
-
-

As many others have done, I installed these Amazon China-made cheapie FJR-style pegs the other day. The springs that come with them are noticeably lighter gauge metal than OEM, but are otherwise shaped the same. I kept the OEM spring on the right side, but I had a hard time with it on the left, so I used the China spring there instead. Works fine, we'll see how it holds up.
The big bonus for me is my lugged boot soles don't snag on the pegs anymore. The longer length and vibration reduction is welcome, too. For $9 shipped, totally worth it. I may even grab another pair for the day when/if the rubber tops wear down.
Hat tip to the forum member who brought these to our attention!
Cheers.
-
2
-
-
Did the mod today. Raised the tank up almost 5mm, same with the frame. The plastic adjuster plate seems flexible enough to handle the bending. I wasn't sure if the tank bolts would still be long enough, but they are. Got plenty of purchase even after losing 5mm of their length.
My seat didn't have any vertical wiggle room at the front like others have stated, but that didn't seem to matter. Will ride tomorrow to gauge the improvement, but along with reshaping the foam, I should have almost no slope now. Yay!
-
4
-
-
Update: Just learned that Garmin max operating temp is 113F...not 131F as I originally posted. I've edited the post, sorry for any confusion.
With this revelation I'm more convinced that my shutdown issue was most likely heat related.
Take away: I need to improve my diligence re Garmin 396. Going forward....
> On hot days, anytime I stop the bike for more than a moment I'll remove the unit from its cradle to avoid overheating.
> Will observe charging icon to ensure proper elec connection.
Thanks to all who responded! Cheers.
-
1
-
-
7 minutes ago, betoney said:
You would know if it loses connection to the power source. I have been using Garmin GPS units in personal vehicles, work vehicles and on the bikes for close to 20 years, when you lose charging power you get a warning screen telling you so. I have had a few charging cables go bad over the years, both 12v plug in and hardwire cables and always get this screen when it charging power has been lost.

Good point. I get that screen whenever ignition is turned off, both on the new 396, and the Garmin in my truck, which is normal Garmin operation. As you point out, the appearance of that screen alone, confirms a good elec connection. Good catch. At the gas stop the other day I didn't notice whether that screen appeared on the 396, wasn't paying attention. But the unit was functioning up until stopping for gas.
Just to add to the confusion....rolling around in my head during this recent 396 shutdown, was what the Garmin in my truck did last November while on a 650 mile trip. Started out a dawn, Garmin acting normally. 15 minutes into the trip decided to stop for breakfast. Came out of the restaurant to resume driving....Garmin is now dead. Tried everything I could think of for a couple hours while driving, to get it working....nada, kaput.
Gave up on it, figured I would have to send the unit in for repairs/replacement. Later that night I went out to the truck to listen to the radio, turned ignition on....voila....Garmin is now working fine again. A couple months ago, it did it again, but only for about an hour before returning to normal. Mystified, I just accept that the Garmin is going to temporarily fail every so often.
-
1 hour ago, wmailhos said:
I bought the 396 LMT-S last fall and just got around to wiring it to the battery and mounting it within the last month or so.
Just curious how you have it connected to the battery? Loose connection not allowing for a good solid charge possbily?
I just stuck the exposed wires under some other terminal connections for now until I can get the end connections wired up properly and worried about it coming loose and not keeping it charged.
I spliced the hot lead into a switched-live wire under the seat, soldered the connection, double shrink tubed, then re-wrapped the loom. Negative lead received a crimped circular connector, screwed directly to battery neg terminal.
I was hoping for the problem to be a bad elec connection rather than a heat related issue. But alas, physical inspection and VM confirmed elec connections are fine. I could repair a bad connection, but excessive heat situs....
-
1
-
-
2 hours ago, keithu said:
I've never had mine shut down due to heat, but I suppose it's entirely possible. You also mentioned charging... Perhaps the unit wasn't fully engaged in its cradle and wasn't charging? The mounting system on the 396 cradle makes me nervous and I always double (sometimes triple) check it. I have on occasion had it snap more fully into place during one of these checks.
I guess that's a possibility, perhaps it got jostled loose a little bit from vibration during the ride, just enough to break electrical contact? I'll be watching the charging icon from now on!
-
Weird event the other day. Hot day, AT ~ 96F. Garmin is working fine. About 80 miles into a spirited ride, I stop for gas. CT is ~ 220. Get back on the road and realize the Garmin is not working, just black screen. Dead.
Try to reboot...nada. When I get home my VM reads ~ 5.5 volts present at the contact points, so I know it's getting power. Suspecting the issue may be heat related, I bring the unit inside the house for a couple hours while I search the web for ideas and have lunch.
With the Garmin having cooled down and back in its saddle, I hold the on/off button down with engine running. In 15 seconds it comes back on and seems fine again, no lost settings or anything.
Garmin says the max operating temp is 113F. While at the gas station I notice the engine heat rising straight up to the handlebar area, big time. Wondering if that could raise the AT from 96F to 113F+ near the Garmin, thus causing the unit to shut down?
Caveat; Complicating the (to me) mystery, while the unit was in the house cooling down I cleaned the contact points on the unit and its saddle. I didn't think it needed cleaning as it's brand new and has only been on the bike for < two weeks. So I can't know for sure if the contact cleaner solved it, but that seems unlikely given that the contacts looked pristine.
The Unknown; During the ride that day, I can't say for sure that the unit was actually charging, didn't bother to check for the little lightning bolt icon charging indicator.
I'm sure I'm missing something obvious here, but has anyone ever had their Garmin overheat and shut down?
TIA
EDIT: Mistake....396 max temp operation is 113F .....NOT 131F. Mia culpa.
-
On 7/6/2020 at 11:21 PM, Wintersdark said:
The upside is it has minimal impact on the "in practice" seat height - 4mm at the front, none at the back, so only 2mm higher in the middle - but the difference to the slope of the seat is surprisingly noticeable. You "roll forward" much less, which is really welcome particularly when braking. Makes sitting further back on the seat a fair bit more comfortable too.
If you want to go higher, you definitely can if you follow my tip above re: putting washers under the gas tank bracket to lift the rear of the tank up even more, and that'll buy more room to lift the front of the seat. But I found the 4mm was really adequate - I'm happy with where it is now.
Outstanding!
Nice hack, I'll be doing this tomorrow. I'm thinking this will enhance the seat reshaping I did a few days ago. I cut away about a half inch of foam from the rear area (can't go much further down before hitting the pan back there). Another few mm's to the front?....great, every little bit helps!
-
Because I have a phone, GPS, and insurance to cover any towing expenses, I only carry one of these....and whatever bullshit tools are under the seat, which I have no intention of ever using. I'll change a fuse if I have to, but no way I'm wrenching outside the comfort of my garage. Lazy?....you betcha!

-
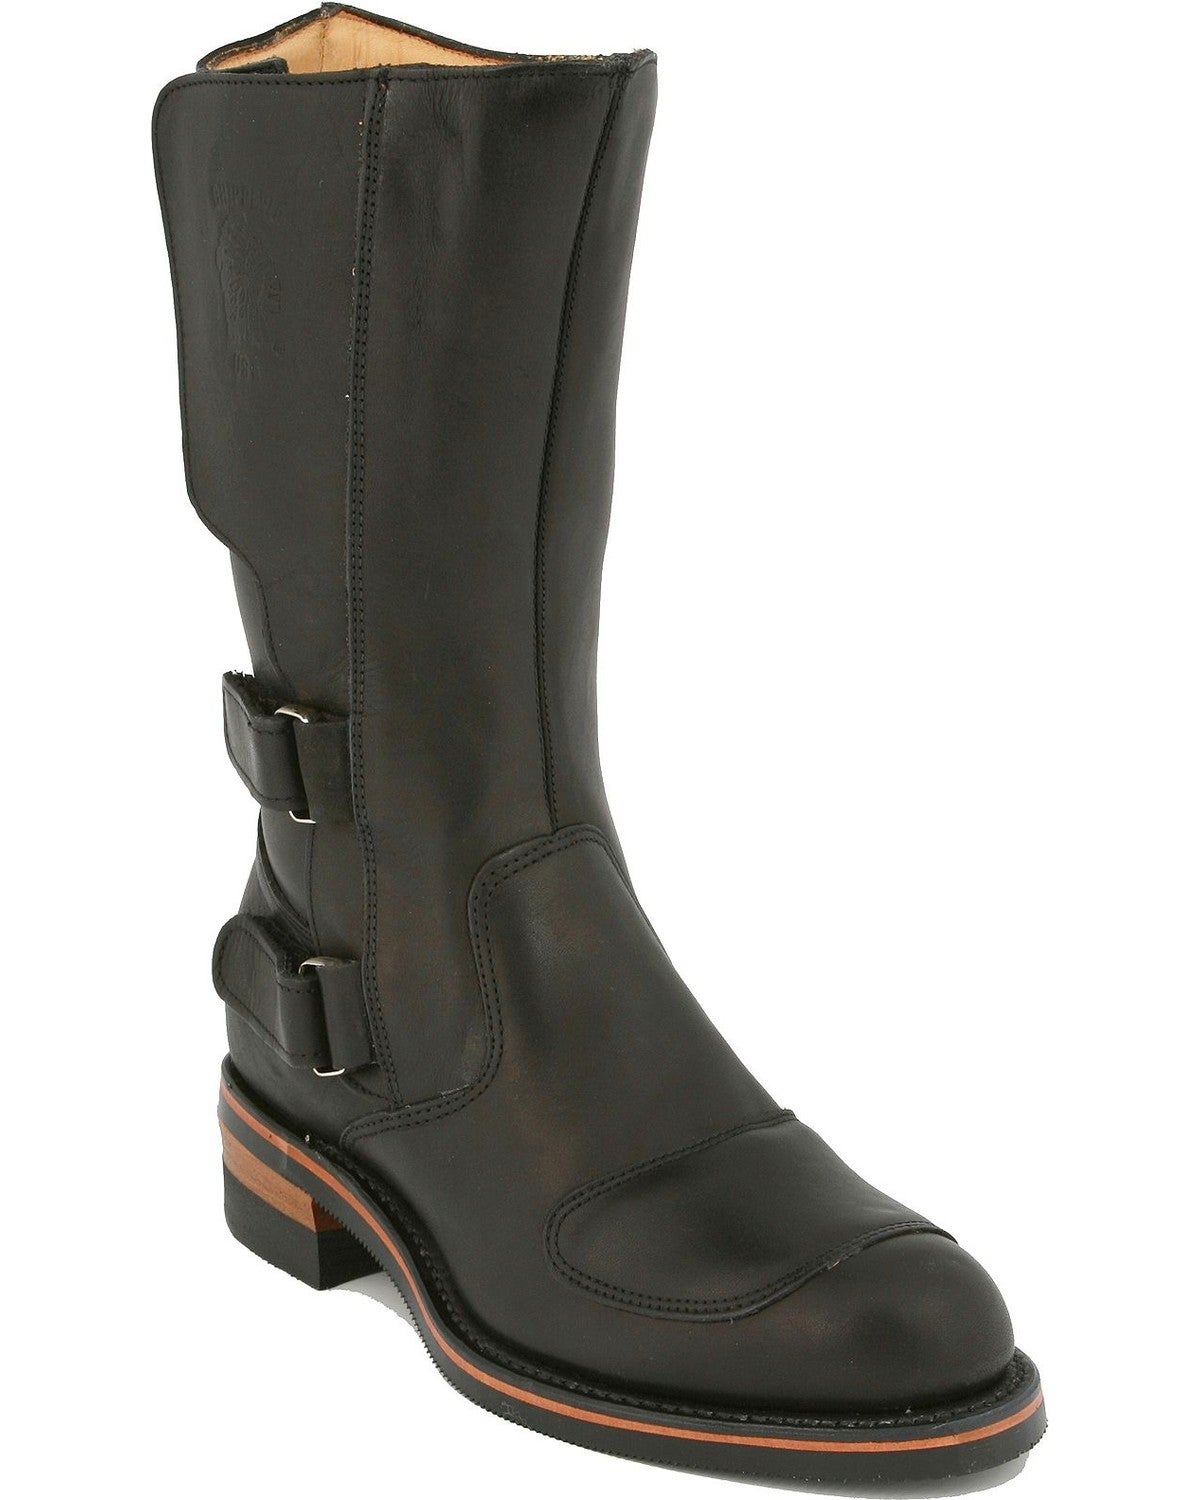
Two pair of USA Chippewa's.
> One light weight pair that are part leather, part cordura for warm weather, side zipper, storm flap. Can walk around all day in them. (no pic)
> One pair heavy duty "Rally" boots. Brown bison hide, calf skin lined. For cold weather, not for walking at all. Great when I lived in Colo....may never wear them again, now that I'm in Arkansas!
Like this, only brown bison.


In retrospect, the music did warn me...
in FJ-09 Tracer 900 General Discussions
Posted
Hot day "down" in Denver?....no prob, just head "up"! Took this pic near the top of Rocky Mountain Nat'l Park in August. Temp in Boulder that day was 95+F. At the top it was in the low 30'sF. Break out the winter gear for a few miles. The '99 oilhead was mine, put 75K miles on it without a single issue.