


maximNikenGT
-
Posts
1,043 -
Joined
-
Last visited
-
Days Won
5
Content Type
Profiles
Forums
Events
Posts posted by maximNikenGT
-
-
After only my second ride on my Niken GT come to find out that I lost another left hand side license plate bolt. Two rides, two different bolts vibrating off and getting lost. The real risk being that I may lose my license plate at this rate. First bolt that I lost was a wingnut with reflector style. Second one was a security torx screw with bolt. What are folks doing to make sure your license plate bolts are staying on?

-
An trying to figure out best way to connect and mount a V1 to my Niken GT. Valentine One suggests the following but I've never seen this mount before. Anyone have successful mounting configurations that work well for you? Note I'm planning on using the concealed display but am torn between trying to keep the bike relatively moisture resistant and having appropriate rider aids for long distance rides
 Motorcycle Cockpit Management : SAENG
Ensure your motorcycle is in prime condition for touring with the help of...
Motorcycle Cockpit Management : SAENG
Ensure your motorcycle is in prime condition for touring with the help of... -
2 hours ago, maximNikenGT said:
Please share with me how you did that. I may end up converting both outlets using your method.
I'm curious if it has something to do with the plastic that is used. I was riding when it was moderately cooler outside mid 50s Fahrenheit and if the plastic just contracts due to the colder ambient temperature. If it was hotter outside I'm wondering if the lighter adapter would actually keep its connection better. Is it the same regardless of hot or cold outside?
-
9 hours ago, betoney said:
Common issue even as far back as the first year FJ, the 12v socket routinely lost connection with my GPS. Its really easy to hardwire the GPS to the key-on auxiliary circuit and never have to worry about it again. I ended up disconnecting the power from my 12v socket and using it for something else.
Please share with me how you did that. I may end up converting both outlets using your method.
-
Just finished a 150 mile ride. A few more notes :
1. If a motorcycle ever needed cornering lights, it's the Niken. Assuming 0 degrees is directly in front of you, the light illumination cuts off sharply at 315 degrees and 45 degrees at the outer edges of the beam throw.The harder the turn at night, the darker it is going into the turn. Part of the reason has to do with how far the LED headlights on the Niken are recessed into the projector headlight housings in the fairing that causes such a sharp cutoff.
2. Hooked up my Garmin GPS using the front cigarette lighter adapter above the dash. The problem is that while i was riding, the cigarette lighter adapter would constantly wiggle out of the socket and prompt my GPS to ask if I wanted to resume using battery power only. It's not like the Niken has a lot of vibration, it's actually a pretty smooth motorcycle. But there is some vibration in conjunction with the socket tolerances of the lighter adapter that prevents a solid connection at freeway speeds.
3. Cruise control works well. Makes a huge difference on long distance rides.
4. Wind protection on the Niken is not as big as you'd think with such a large front end. My head was in a full airstream despite the touring windshield of the GT and my legs, shoulders and hands felt the cool of mid 50 degree Fahrenheit night air.
-
Saw this link for an aluminum customized Niken.
 Game Over Cycles Custom Yamaha Niken: A World's First Unveiled
Meet the Game Over Cycles Custom Yamaha Niken. GOC became the...
Game Over Cycles Custom Yamaha Niken: A World's First Unveiled
Meet the Game Over Cycles Custom Yamaha Niken. GOC became the...-
 1
1
-
-
Givi LED installation notes:
1. Screws retaining the stock lighting reflectors require super small Phillips head screwdrivers and are torqued so tight I was afraid I'd strip the heads during removal. A little bit of WD40 helped immensely and the stuck bolts came right out.
2. Cannot believe how small a flathead screwdriver (think watch screwdriver small) you have to use to release the wire retaining bolts for the LED lighting. Minimal wire clearance with surrounding plastic added misery and it was only with a bit of persistence that I was able to thread the tiny 16 gage lighting wires through these tiny holes. Also when the instructions said to use a ball peen hammer knock out the bottom V47 topcase plastic, I used my drill to get a pilot hole going and then used the hammer to knock out the remaining plastic with ease. Without the pilot hole the hammer would wander during strikes.
3. When drilling holes into the V47 top case, use a 5/32 drill bit for the 4.5mm holes.
4. The plug that has to be inserted to the bottom of the case should be separated from its housing first in order to get a good seal with the top case. Do not try to force it in.
5. I also installed a back rest for pillion riders. Use a 5/16 bit for their recommended 6.5mm holes for the retention bolts and washers for the back seat rest,and be sure to use their paper template to determine where hole positions should be. I took a punch to hammer in the perfect point to where the drill bits needed to be ensure a perfect hole. If you don't use a punch to guide your initial hole drilling there's a good chance the drill bit will wander on the slightly curved V47 monokey plastic mounting surface.
6. I used a 12v LED Xmas light tester to test my wiring before hooking everything up to ensure my connections were solid.
7. I'm going to use some silicone sealant / caulk to seal the area at the bottom of the V47 case where the wiring enters in order to ensure a water tight seal.


-
Finally got the first oil change and filter completed only to have hurricane storms roll through the Carolinas with some heavy precipitation. So when everything was dry I finally got the chance to take it out for my first night ride. A few thoughts:
1. Stock LED headlights throw a trapezoidal beam pattern with the widest part at the top. There Is an almost razor sharp cutoff in lighting in the area beneath the trapezoid closest to the bike - where the ground immediate in front of the bike beneath the sunscreen is dark area. Maybe it's the LED technology but the throw of the stock headlights didn't quite wow me for a bike being billed as a GT bike. Aftermarket driving / fog lights seem like a must have on the Niken GT since the throw even with high beam doesn't inspire me with a ton of confidence for early morning mountain rides where encounters with animals is not that uncommon.2. While the dash is illuminated, none of the switches on the handlebar are backlit, not even the emergency flashers. I may have to see if I can get some luminescent paint to at least give some kind of nighttime legibility to the switches.
3. Rocker switch on left hand side to control hand warmer settings / scroll through trip meter options are a bit odd in that the top of the switch is bigger than the bottom - seems like Yamaha wanted riders to use their thumbs to cycle up and push down with their index finger to cycle down. Now I understand why BMW uses a jog dial. Much easier to use and fits a wider range of hand sizes for actuation.
4. Standard stock settings on the Yamaha as recommended in the owners manual was a bit harder than I expected for my tastes. May need to dial back the compression and rebound settings a bit too soften up the ride to my liking
5. Level 10 maximum hand warmer settings were too hot for my ride at 70mph with 59 degrees Fahrenheit ambient temperature. Level three was just good enough for me.


-
 1
1
-
-
First video I've seen of a Niken going through a Gymkana in Japan.
-
 1
1
-
-
Thought I'd document oil change procedure for a 2019 Niken GT for posterity purposes.
1. Get appropriate parts: Yamaha oil filter, Yamaha drain bolt crush ring, appropriate motorcycle specification Synthetic oil Yama lube (
Mobil 1).2. Assemble needed tools: drain pan, nitrile gloves for the oil, appropriate socket wrench size for drain nut, oil filter wrench, paper towels or shop rags for any spillage, and oil funnel for putting in fresh oil back into the engine.
3. Fire up engine for about a minute to warm the oil up and shut down engine.
4. Use oil filter wrench and loosen the oil filter counterclockwise prior to draining - this week release any internal vacuum pressure vacuum pressure. Be careful in that the oil might be hot.
5. Place drain pan underneath the drain plug and then carefully unscrew drain bolt counterclockwise until oil comes out. NOTE: the oil will shoot out pretty far initially in a horizontal direction so place the drain pan a little bit forward of the drain hole. While oil is draining go ahead and fully remove the loosened oil filter.
6. Using the fresh oil, line the inner rubber gasket of the new oil filter with fresh oil and pour a little bit into the oil filter directly and apply some fresh oil to the rubber gasket seal so that it's not completely empty/dry when firing it up. Hand screw the oil filter on until snug, and then 1/4 turn the oil filter using the oil filter wrench.
7. Once oil has stopped draining into the drain pan, replace crush ring on drain bolt with fresh one and screw drain bolt back into the drain hole. NOTE: the crush rings are designed for single use only. Do NOT reuse because the Yamaha ones are designed to deform when tightened down to make a tight fitting. Note the pictures below of the side profile of the crush ring in that they are different from your typical flat washer.
8. Use funnel with long goose neck to add oil back into the engine. You cannot use just a traditional funnel on the Niken GT because the CP3 engine cover juts out at such an angle that prohibits the use of a typical funnel e.g. the funnel is almost sideways once you stick into the oil filler hole.
9. Pour 2.4L of fresh oil into the goose neck funnel. Put oil filler cap back on and fire up the engine for a minute to let the new oil circulate and shut off. once shut off, look at the oil filter level viewer to see whether it is between the top and bottom marks. Add a little bit of oil at a time until it reaches the appropriate level. DO NOT OVERFILL. More is not better in this case because when the engine gets hot, it could over-expand and damage internals due to high oil pressure. Maximum oil according to owners manual is 2.7L when replacing oil and filter, 2.4L if oil only.
10. Recycle your used oil and filter at your local oil change shop or take it to your local oil recycling facility. Do NOT pour it down the drain or storm gutters.
Photos below of appropriate parts and their part numbers:


-
2
-
-
After giving my Niken GT a bath I went to lube my chain. Cleaned off my chain with paper towels and nitrile gloves since I was using 75w90 weight Redline gear oil for lubrication. While I was cleaning off the dirty chain a horrific smell came off the chain. None of my other chain driven motorcycles smelled like that when cleaning. Is this normal if you're chain hasn't been cleaned in 800 miles on a new bike? The smell was so putrid I almost gagged. Smelled like something died on the chain.
-
On 9/9/2020 at 3:36 PM, betoney said:
In a crazy, futuristic kind of way, that is actually pretty cool looking. I hope it actually comes to production.
The concept is VERY impressive, some of these photos at the bottom of the page detail more features.

 NEW 2020 Honda NEOWING Reverse Trike Motorcycle Patents = Release Date Coming Soon...?
– NEW 2020 / 2021 Honda Motorcycles: More NEOWING Patent...
NEW 2020 Honda NEOWING Reverse Trike Motorcycle Patents = Release Date Coming Soon...?
– NEW 2020 / 2021 Honda Motorcycles: More NEOWING Patent...If Honda built this and sold it, it'd be the closest thing I'd have to recreating a childhood scene from the movie Akira. I would have seriously considered this if it was available.

just clicked on the link above and read the following:
"NEOWING is an unprecedented three-wheeled vehicle that offers the cornering feel and sporty ride equivalent to a large-sized motorcycle while realizing excellent stability in low-speed ranges. This vehicle is equipped with a hybrid system that combines a horizontally-opposed 4-cylinder engine and electric motors to generate plentiful torque for powerful acceleration. With the adoption of an original Honda linkage mechanism on its front wheel, this concept model proposes new values with advanced styling that emphasizes the mechanical fascination of a two-wheeled motorcycle model."
Hybrid system on a motorcycle? if they slapped the Goldwing engine in here i'd be sold. The fact that it would be a hybrid system, very interested in what real world range would be on a single tank.
-
1
-
-
Webike Japan review that did a pretty good job of getting some excellent action shots in rainy conditions as well as a deeper technical view of the mechanics that make the bike work the way that it does.
-
2 hours ago, Tango said:
The first thing I can think of is about the 2 front wheels and 4 shocks.
How does it feel entering and exiting curves of different degrees? It has to be different. More confident with double the contact patch area?
Once you get past the sheer size of the front end, after about 15 minutes I started to feel really comfortable on the setup. Rides just as well and in some instances better than a two wheeled motorcycle. The beauty of it is after a little bit of riding, it rides just like a two wheeled motorcycle. If you learned to ride on a two wheeler, then switching to the Niken is easy.
When I got the bike home, the next day was raining all day and when the rain finally let up, I had to take her out for a spin. Even though roads were wet, slow speed turns were taken at a more aggressive angle than I ever did with my '04 BMW R1150R because I felt that comfortable on the setup. At one intersection even got a little bit of slide on the rear wheel but it was very catchable. In an odd way, it actually promotes my inner hooliganism since the bike seems to be more forgiving of the silly stuff you can do on two wheels e.g. more aggressive cornering.
The 4 shocks do visually look massive especially in the gold tones contrasting on Yamaha blue. However, it's not like they're any bigger than the shock tubes on a 2020 BMW R1250R. There just happens to be more of them, and what's interesting about the suspension tech is that one of the shocks is for steering, the other is for stabilization. Think of one of the shocks as a massive steering damper and you get the idea. Oil for compression and rebound damping is only in the remaining shock tube per side.
Going into turns is stupid fun. Not gonna lie. This setup is just begging to be taken to the mountains of NC near Little Switzerland and just have a blast doing some of the twistiest roads. Once I get it configured a little better for long distance rides (e.g. waterproof top case) it's on my to do list.
Cost concerns: With the additional complexity of two front end wheels, I figured that one would have to get a front end alignment on this - which to my understanding, has to be done by specially trained techs by Yamaha. Will post costs when I get to that point. Additionally, with the additional wheel, the additional costs with an additional tire and brakes were a factor for me - however, the blow is somewhat softened by the fact that the front tires are actually 15 inch scooter tires. And given that most of Asia ride scooters as a primary mode of transportation by the millions, getting replacement front tires and brakes are actually not that expensive. Front brakes are anywhere from $30-50USD per pair of pads
 Webike: Motorcycle Parts, Accessories, Gears, OEM parts & Reviews
World's largest online store of Motorcycle parts. Huge stock of custom...
Webike: Motorcycle Parts, Accessories, Gears, OEM parts & Reviews
World's largest online store of Motorcycle parts. Huge stock of custom...and front tires, depending on compound, run anywhere from as low as $75 USD per tire for Bridgestone Battleaxes to $135 for Michelin Pilot Road 4s in 15 inches:
Webike: Motorcycle Parts, Accessories, Gears, OEM parts & Reviews
World's largest online store of Motorcycle parts. Huge stock of custom...

-
2
-
-
22 hours ago, colorider said:
Looks good! How does that price compare to similar (3-wheel) sensors on Amazon?
However reviews are definitely mixed with regards to quality.
-
As best as I can with only a week of ownership under my belt. What questions do you have about the Niken GT?
-
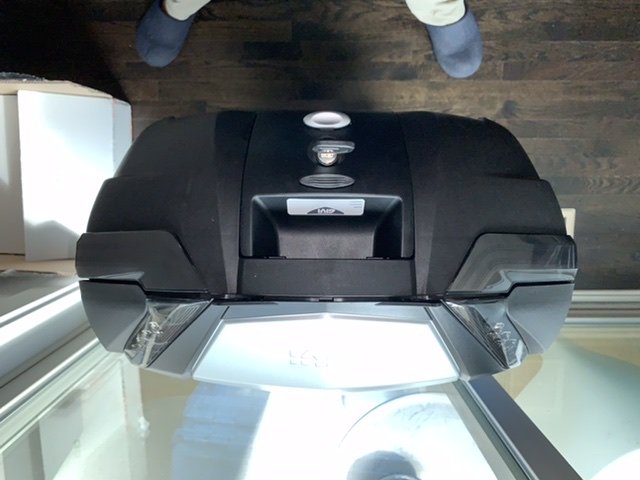
Received Givi V47 Monokey top case, Top case back rest and base plate in the mail today from Revzilla. Only problem is the metal base plate (M9) does not allow for the installation of LED lights, have to order the plastic M5 for monokey (NOT the M5m) so you can run LED lights. Quick call to customer service to update their product recommendation for this kind of combination and a free return authorization, and placed a new order for the M5 plate.


-
Ok was looking at tank bras for my Niken GT. Years ago I had a Mag Knight tank bra for my '95 Kawasaki ZX-6E that worked great.
Called them up in Washington state and they don't make one specifically for Niken and suggested that I try their smaller patch versions instead. But before I ordered, they cautioned me to check with a magnet to verify that my gas tank will allow the user of magnets.
I took a magnet to the gas tank, lo and behold, if did not attract at all. So is my gas tank not of metal that allows magnets to attract or is it a by product of the matte paint?
Never had a bike before where the tank didn't allow you to put on this kind of tank protection, is this normal for newer bikes?
-
Any opinion on whether these work? Buddy of mine swears by them and have them mounted on his truck bumper : Deer whistles. What's the consensus - life saver or snake oil?
https://www.amazon.com/Living-Products-LLC-0001-Save-A-Deer/dp/B003XNGLJU
-
On 9/10/2020 at 7:44 PM, Tango said:
For your Niken? It's probably in the owners manual if you have one.
If not go here...
Wow maybe you can't adjust. I didn't see it listed under "Seats" and only specifies 32.9" in the specs.
Nothing in my owners manual regarding adjustable seats.
-
Definitely didn't see anything resembling this on my Niken GT.
On 9/10/2020 at 6:14 PM, Stew said:Well I can only speak for the Tracer (non gt). Take the seat off and there is a big plastic sort of lever thing that raises or lowers the seat position, then the seat clips back on in H or L positions (hard to describe, and the first time I tried it , both myself and my mechanic brother-in-law took a good 10 minutes of head scratching and panicking as we couldnt get the seat back on, until I noticed the H and L marks
") )
)


-
On 9/11/2020 at 11:54 AM, colorider said:
Okay, he ordered his from Alibaba which is apparently a Chinese Internet sales site similar to Amazon. I did a quick search and did see atleast one unit that was designed for 3-wheeled vehicles.
Good luck!!!Found it. $60 isn't too bad.
 Guangdong Spy Lcd Display New Design 3 External Sensor Wheels Motorcycle Tpms - Buy 3 Wheels Motorcycle Tpms,Tpms Motorcycle,External Sensor Motorcycle Tpms Product on Alibaba.com
Guangdong Spy Lcd Display New Design 3 External Sensor Wheels...
Guangdong Spy Lcd Display New Design 3 External Sensor Wheels Motorcycle Tpms - Buy 3 Wheels Motorcycle Tpms,Tpms Motorcycle,External Sensor Motorcycle Tpms Product on Alibaba.com
Guangdong Spy Lcd Display New Design 3 External Sensor Wheels...-
1
-
-
Currently seeing anywhere from $13400 to $17300 USD on Cycletrader.com for brand new 2019 Niken GT'S from the dealerships.
-
Has anyone actually installed driving/fog lights on a Niken GT? Am trying to find actual examples of folks who have installed them successfully and cannot find any examples. Please post photos here if you run across any that have. I'm trying to figure out where you would mount them since I'm not sure that you can mount them on the front suspension tubes.
UPDATE: just got off the phone with Clearwater Lights of California who indicated that it is possible to mount their smallest Darla lights on the bottom front fender bolts right in front of the silver part of the suspension. Anything larger than the Darla light will overwhelm this single bolt bracket and you would have to go to an engine protector mount. The one thing they mentioned was that because of the LED lights of the Niken, one cannot tap into the existing high beam wiring to power aftermarket driving lights because of the method used for powering high beam LEDs is different than traditional halogen high beams. One would have to purchase their dimmer switch and run it separately to power the lights, and they confirmed I could not use an Arboreal Systems Neutrino power distribution module to power the Darla lights. Apparently this is becoming more and more of a compatibility problem with bikes utilizing LED headlights - hence why you don't see any photos of Niken's with aftermarket lights.
Anyone know of motorcycles with LED stock headlights that are still able to use aftermarket driving lights?


Givi top case install diary
in Yamaha Niken Forum
Posted · Edited by maximNikenGT
Grammar correction
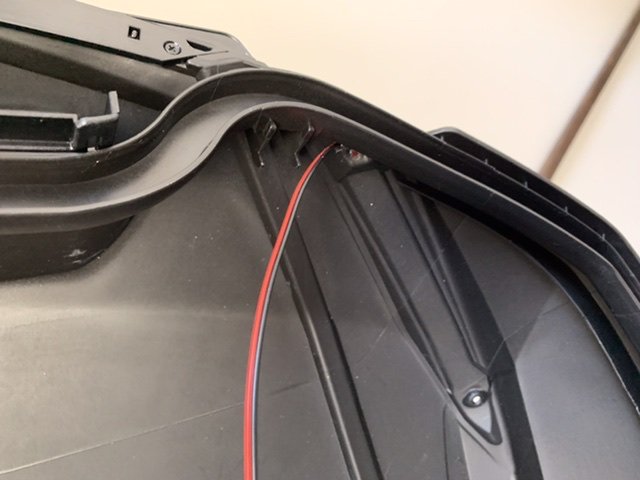
Ok so I pulled all the hardware together and finally loosened the necessary hex screws from the saddlebags and the existing tail plate to attach the necessary tail extension rods before finally mounting the M5 plate. The M5 plate was tough to align with the holes of the both the steel tail plate extender and the tail extension rods but I finally got them through.
Hardest part was actually knocking out the hole in the M5 plate in order to run the v47 LED wiring cable through. Actually had to drill a pilot hole followed by a sanding tip of my Dremel to smooth out the plastic knock out and ensure a clean install of the LED connector in the M5 plate.
Instructions were ok but the Givi illustrations showed a factory part in a place where it wasn't there when I loosened the saddlebag holders. I ended up keeping the factory rubber washer where it was and it didn't affect the installation tolerances.
After I used my bicycle torque wrench to get all the bolts tightened appropriately, I took my V47 out and did a test fit. Looks pretty good if I don't say so myself.
Now - need to figure out which electrical cables actually run to my taillight to splice in the final LED connections and the topcase should be ready to roll.