


clint
-
Posts
538 -
Joined
-
Last visited
-
Days Won
1
Content Type
Profiles
Forums
Events
Posts posted by clint
-
-
I made it myself using an Axio backpack I bought off fleabay.
What make is that red tail bag @clint ?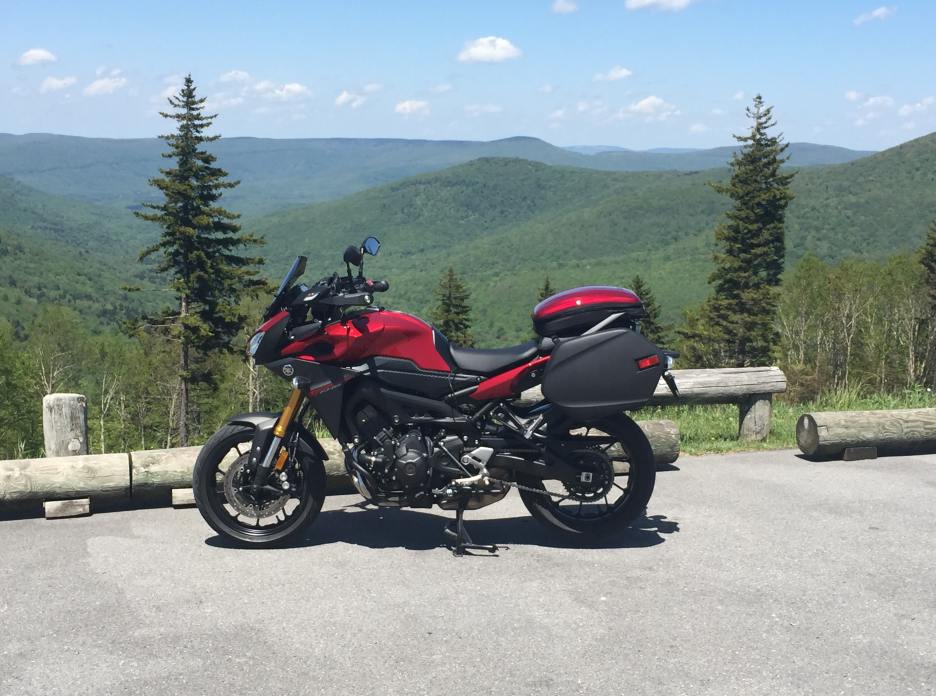
-
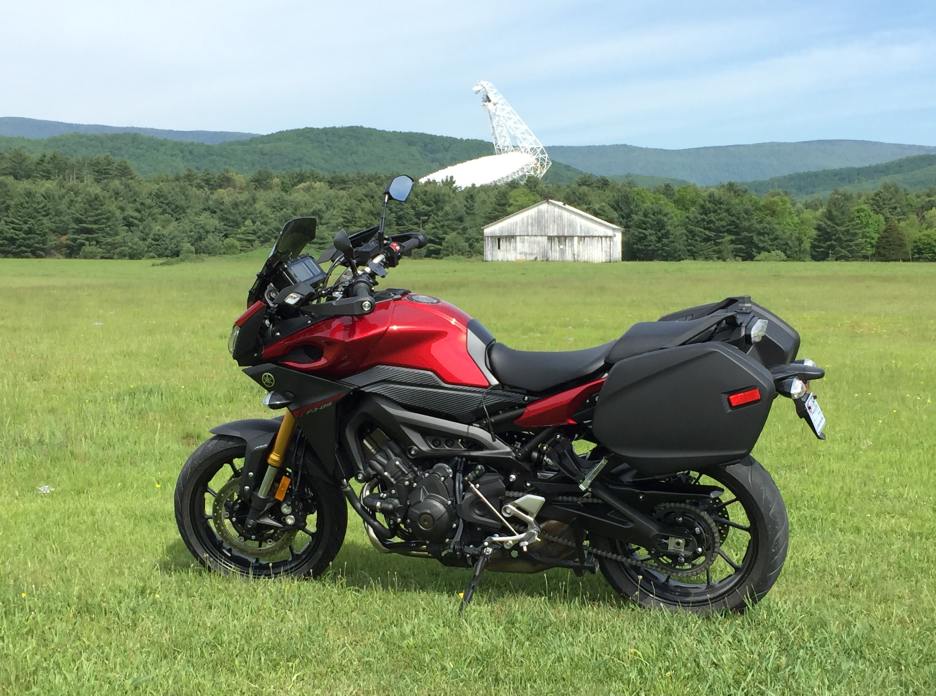
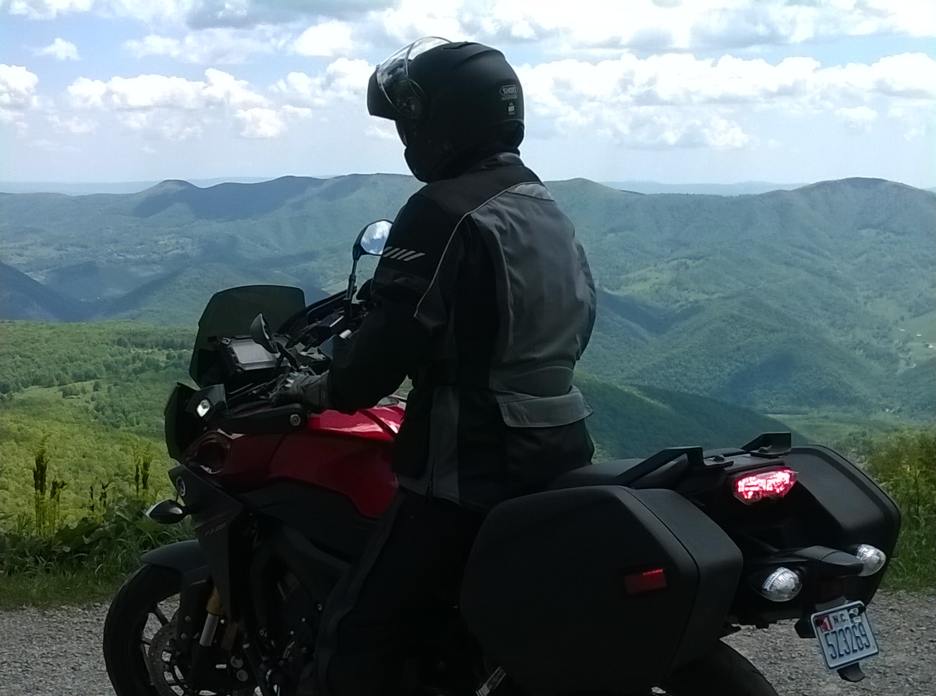
Some pictures from my rides to WV.
Greenbank Observatory
Highland Scenic Highway - WV 150
Spruce Knob, WV
-
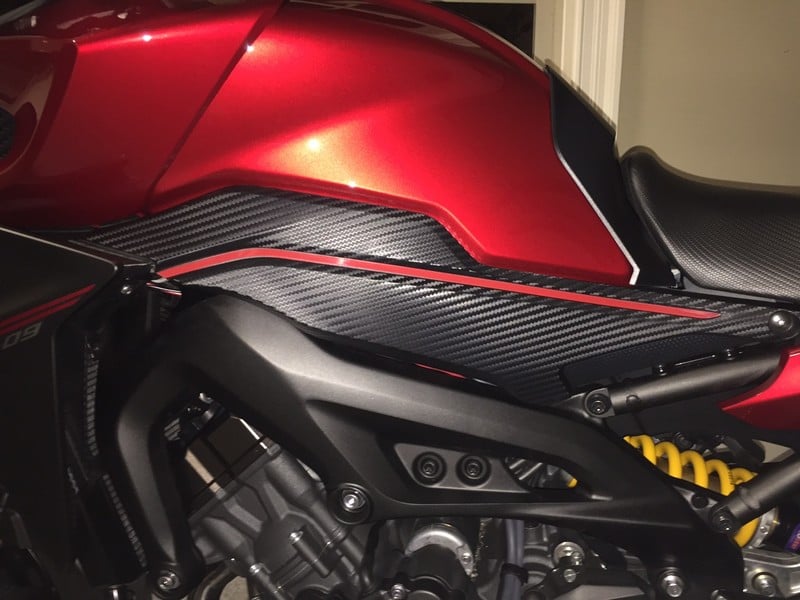
Added a red pinstripe!
-
Very nice sir! Where did you get the red striping tape? What is the width?Put red striping tape on the side panels... and modded the stock screen into a shorty (cut ~7" off the bottom end), mounted to the Puig Touring bracket. Very happy with the look of the screen (will take some photos with it on the bike tomorrow). Had to shape the bottom of the screen a little bit (with a heat gun) and used 1/8" spacers to better align with the bracket geometry.
-
Tank should come off. @nsmiller posted a YouTube Video recently on how to replace the spark plugs. Very well done.Gonna replace the plugs on mine soon, is it easy to remove the tank? Do you disconnect everything and completely remove it or just enough things to rest it to one side? TIA
I've ridden 3 of the past 4 days here in NC and these plugs are great. Really no difference in the stock ones, but should last a lot longer!
-
Of all the brands I've ever used, and I've used them all, Dunlops have been the worst. I tend to lean (pun intended) towards brands with 0 degree belt construction, providing a linear turn in vs. tires with a more triangular shape that fall into turns. But mostly, Dunlops don't hit the price/performance marker for me to buy them. I'd probably pick up a set of Q3s for a track day, but that's about it.
Why would you say that? If you don't mean it, use the winking smily face:Friends don't let friends ride on Dunlops!
-
I changed the spark plugs and air filter today at around 12,300 miles. I used the NGK Iridium CR9EIA-9 and stock air filter. The stock copper plugs were colored perfectly and could have certainly lasted 20,000 miles. It only took a couple of hours working meticulously....not hard at all really. The bike fired right up with the iridiums and I'll take it out for a few hours tomorrow.
-
Friends don't let friends ride on Dunlops!Changing my first rear tire. I got 3671 miles on that first Dunlap D222. The first 1755 miles were put on by the previous owner. I got a free set of Dunlap tires by way of entering a contest on the podcast, "Talking Motorcycles with Barry Boone". I got Roadsmart II's.
The original front looks great. These tires may be a 2 rears tires to 1 front tire. I'll find out.
-
I recently upgraded to Stebel HF-80 and they are comparable is shape to the Hella units.I need REALLY LOUD horns for year-round commuting in the DC area. I used Stebel Nautilus air horns on my 07 Wee Strom for years. They were plenty loud three-season horns, but they didn't like cold weather and took a split second to load enough air to honk. They'd go back to a wimpy single tone in the cold, and I went through a couple of sets in the nine years I owned the Wee.
The Hella Supertone Dual Horns did well in the horns review in the April 2014 Motorcycle Consumer News (downloadable at ), so I got a set to install on my 16 FJ, together with a Murph's wiring kit. They were on sale at Amazon for $40 or so.
The Hellas are electromagnetic diaphragm horns, so they should sound promptly and LOUD when the horn button is pushed, but they're pretty big @ 4.75" diameter. I want to install them horizontally between the forks and around the fairing level, like people are doing with the Stebel 80s. Since they'll be more or less just under the leading edge of the fairing and not really visible, they can overlap a bit if they don't fit too well side by side in the space.
Any advice before I get started with the installation? I searched the FJ forum for 'Hella horns' but didn't get any hits. TIA, PFJohns.
Stebel HF-80 Upgrade
Used in combination with the OEM horn, they're extremely loud. Very happy with the results.
-
Yeah, not a recall. Go get the bike, ride it home and install the APE. Your bike, your terms...bug off (st)ealer.Dropped my bike off at the dealer to replace a leaky fork seal just before Thanksgiving, only to find out a couple weeks later they had decided to do the CCT replacement while it was there. They referred to it as a "recall". Funny, because I never got a notice like I did with the shift cam recall. The ETA for the revised CCT kits keeps getting bumped, now looking at beginning of Feb. Best time of the year to ride here in FL and I'm grounded. Wishing I had gone the APE route when I was considering it awhile back. Sigh.
-
Sprockets looked good on mine too, so I just replaced the chain. No issues.Ordered spark plugs, new drive chain,( mine has a slight kink in it @16k), and a new clutch cable. Replacing cable because I want to be ahead of the curve. Question; What's the consensus on replacing just the chain or replacing sprockets as well? Rear sprocket looks fine to me. -
Because "VENOM" sounds so cool! No other reason needed!Can't ride or do things to my bike... so I'm buying things instead... it's therapy (doctor's orders)
-
Yes, that's a Sargent Seat. I had a Seat Concepts seat before and the difference is significant.
...is that a Sargent seat Clint? Looks good on the bike... I was concerned it woul look awkward, but it does not. How do you find it?... me wants one.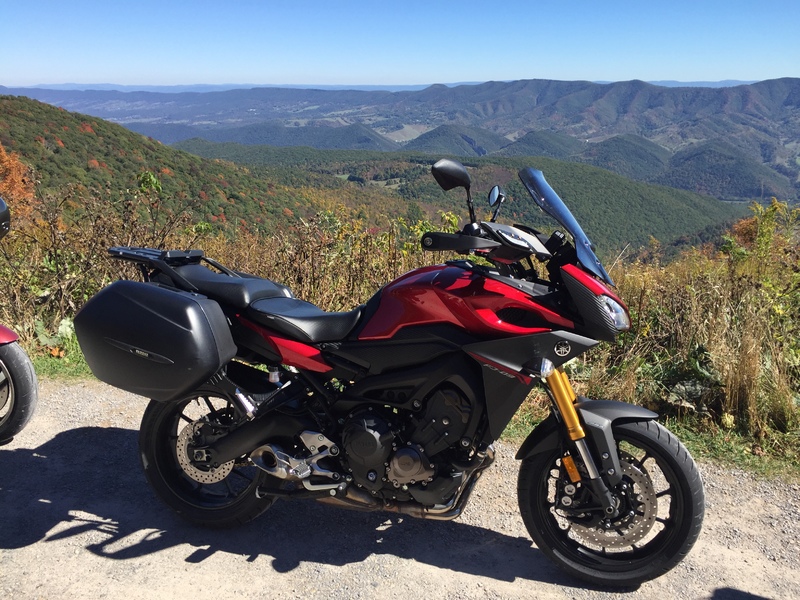

Also, the little bouncy play in the OEM seat is gone with the Sargent seat! It requires a more forceful push to engage the lock. When it's there, it's not moving at all! The Carbon FX matches the Seat Concepts rear very nicely.
-
Well, that's just silly.
Would that make us the Three Stooges?Sounds like a great idea to me! ?

-
You, me and @brick need to get together when things warm up and take trip for a few days. The first pic is on WV-150 Highland Scenic Highway up near Marlinton, WV. The second is on Spruce Knob also in WV.
Ahhh, those pictures look like... home! (or at least someplace real close by)Yeah, I'm not a big fan how a top box looks, but simply can't argue with the utilitarian aspects of it. I've got the Yamaha 39L with the FJR1300 hard bags. It looks so much better without it.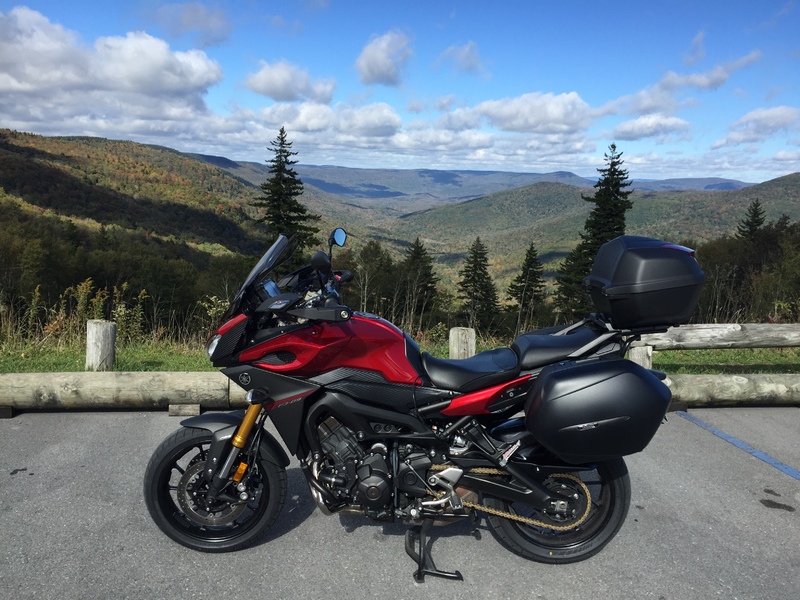
Clint, what did you coat the FJR bags with? Paint? Peel-coat?
The finish on those bags are known as "unpainted" by Yamaha. They were available at one time in the U.S. It's a nice matte finish.
-
Yeah, I'm not a big fan how a top box looks, but simply can't argue with the utilitarian aspects of it. I've got the Yamaha 39L with the FJR1300 hard bags. It looks so much better without it.
...for reference, here's my rig with SH48. Need my top case for commuting... side cases to take stuff on trips.That looks very nice! The combination of the side bags and top case is well integrated into the lines and looks of the bike. Going larger might have provided greater utility, but it would have looked awkward. IMHO
-
That looks very nice! The combination of the side bags and top case is well integrated into the lines and looks of the bike. Going larger might have provided greater utility, but it would have looked awkward. IMHOI went with the sh39, and as I always have my top case on, and hardly ever my side cases, I wish I would have gone with one of the larger top boxes. I always have a tire patch kit, guage, rain poncho and a few tools in there. I have to move things around to get my helmet to fit. I cannot fit a helmet and jacket. I'm not 100% sure, but I also think the build quality on the sh39 may not be as good. While mine has held up fine, it feels a little more cheaply made than the sh36's. And I've read the opposite about the 46 and 49. If your concerned about looks, I had to request the carbon fiber plate to make mine match, so there may be a similar item for the 46 and 49.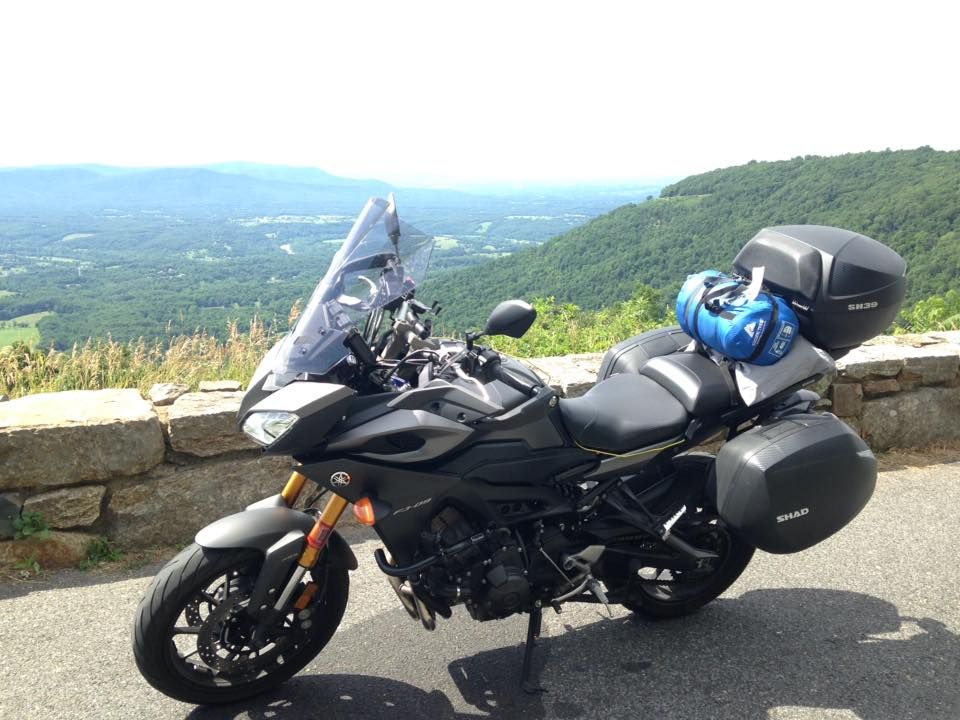
-
Agreed, and that's what I do. But I believe his predicament was that he had to take the wheels to get them changed and didn't want to make two trips since it was 80 mins away.Not necessary... I have a No-Mar tire changer and just do one at a time.. -
I've got a Coats 220 tire changer in my garage, but have had both wheels off the bike at the same time, no problem. Put it on the center stand and remove the rear wheel. Remove or loosen everything on the front wheel to where you are ready to remove it. Then use a floor or scissor jack with wood block under the header or catcon to raise the front tire 1 inch off the ground and remove the wheel. Put the front wheel back on first.Thanks guys. I guess I'll do one wheel at a time to be safe.
-
Should be fine. There's not much weight on the front wheel when it's on the center stand. You could also use a floor jack with a small piece of wood on it. I used that method when taking the forks off.So I want to remove my from wheel to get new tires. I bought one of those stands to lift the front wheel but it will not work, I think its the ABS sensor in the way. So, is it okay, while my bike is on its centerstand, to lift the front wheel off the ground by placing wood under the header pipe to lift the wheel off the ground? My concern is crushing the header pipe or cracking the seal at the head itself. Thanks in advance, Rick -
You rock dude!***UPDATE*** I was FINALLY able to get the shock installed... whew, what a pain in the A$$. 2.5 hours and a lot of skin removed from my knuckles getting the shock into the top mount.
FWIW, when installing the shock, the ONLY way I could get it to fit was to install the rear bolt first then fiddle with the front. I spent forever initially getting the front mounted, only to find that when it is static, the linkage doesn't raise enough to fit the rear mount bolt, not even close.
I wish I cold meet the engineer who designed this bike and ask why everything fits in a puzzle-like manner, then smack him upside the head.

-
I forgot to add that after you remove the nut from the top bolt, connect a couple of 1/4 drive ratchet extensions together and tap out the bolt from the right. That pushes it right up against wiring loom and the shock can be dislodged from the mount. No question, this isn't a 15 or 30 min procedure, it's a fiddly and frustrating process. Relax, be patient and it will come together.
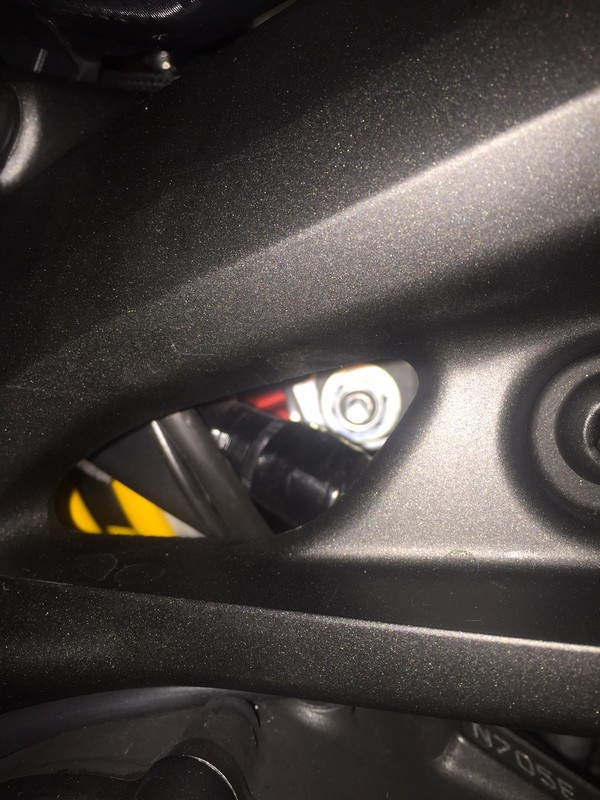
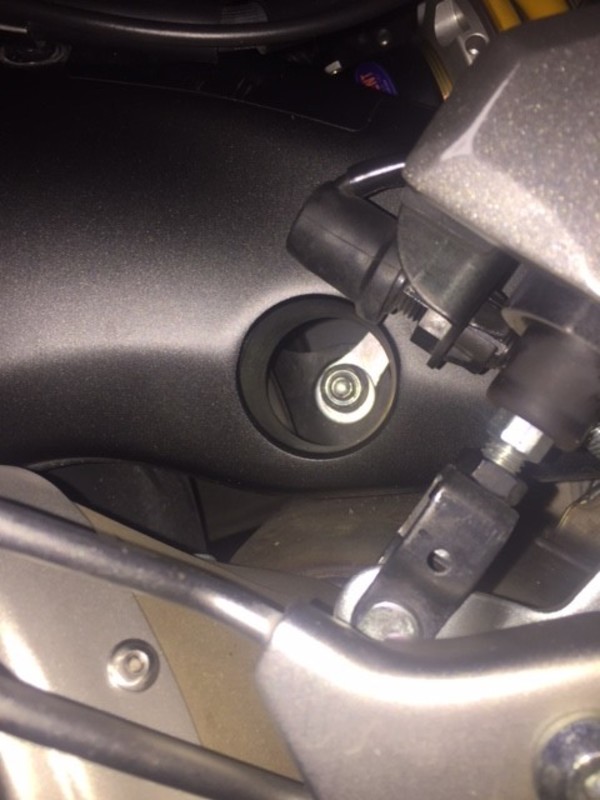
Clint Yes, I can see the nut on the right side, its the bolt head on the left side that I cant access or even see. Once I remove the nut then I have to pull the bolt out from the left to remove the shock, but like I said, on the left side I cant move the wiring harness out of the way enough to even see the bolt head. It doesn't want to flex at all.Okay, let's take a step back. Make sure you're getting to it from the right side of the bike. Right side, as you sit on it. This is what it looks like on mine. You might want to tape off that area of the frame to keep from scratching it up.
Thanks again for your help.

-
Okay, let's take a step back. Make sure you're getting to it from the right side of the bike. Right side, as you sit on it. This is what it looks like on mine. You might want to tape off that area of the frame to keep from scratching it up.
I'm beginning to think that my only hope is to completely remove the tank to aid in access. Regardless what everyone says to just move the wiring to the side to access the top mount, I simply cant move them even a few millimeters, let alone enough to even see the bolt. I know that some say its a 15 minute procedure, but the only progress I made today was removing the lower dog bone bolt. I feel like a frickin' idiot, I finally gave up and threw all of my tools back in the tool box in frustration.The lower shock bolt was a pita, but I got mine out using the assortment of wrenches I had. I ended up using a both a box end and an open end. I could only get only get the nit to turn a very small amount, and worked from both the nut side (left) and the bolt head side (right). Installation went a lot smoother than removal. For the top shock bolt, I came in from the side through the frame as the others, but I had the benefit that my gas tank was removed to install some electrical accessories.
-
I just replaced my shock and it was fairly straight forward. Start with it on the center stand then remove the front bolt using a ratchet and extension. It fits just fine through the wiring. Just nudge it aside. Next, remove the middle dog-bone bolt through the hole in the swing-arm.Sorry to resurrect an old thread, but after reading through this and inspecting the bike for almost 30 minutes now, I cant understand how to remove one single bolt. I can access the lower dog bone nut, but there is zero clearance to get the bolt out. I cant access either side of the upper mount at all, both sides are obstructed by wiring and hoses that do not budge out of the way. And don't get me started on the lower shock mount, unless you have a 2" long wrench with zero leverage, there is zero access. I'm not even sure how they possibly assembled this bike. On my FZ1 I could remove and replace the shock in about 15 minutes. After wrenching on bikes for over 40 years and doing almost all of my own maintenance, I am thoroughly stumped with this bike.
Now, you can raise the swingarm up by placing a 2x4 under the rear wheel. Raise it up until you can get a ratchet and wrench on the lower shock bolt.
Install the new shock attaching the front bolt first, then rear shock bolt, then dog bone.
Accelerator Position Sensor (APS) Adjustment
in FJ-09 Tech Tips/How to's
Posted