


Cruizin
-
Posts
2,461 -
Joined
-
Last visited
-
Days Won
38
Content Type
Profiles
Forums
Events
Posts posted by Cruizin
-
-
Guys and gals, Bike bandit has a pretty good helmet sale going on Bike Bandit helmet sale
-
Since I don't get to 40, let alone 45 degrees of lean anymore, I hadn't considered that question. At 46 plus degrees, whenever the outboard wheel "lifts" (or quits providing support/traction) will the Niken want to fall inward, straighten out, tighten up the curve or...? It seems like a Niken rider would want to know before finding the answer somewhere on the Tail of the Dragon.I'm interested to see how the 45 degree limit to the lean angle will play out.. Not that many riders will go past that on the street but in theory could limit maneuverability. I would like to test ride one just to say I did.
Considering the geometry for a minute, I predict that this bike requires less lean to turn sharply than a two wheeled bikes does. Has to do with that other wheel sliding out to counter balance. Again, it's like skiing down a mountain with two ski's. Almost the exact same operation as downhill skiing.
Plus, I promise you hat the amount of guys and gals that dont go more than 45 degrees is a ton higher than we think. I know a lot of guys who THINK they lean that far that really don't.
-
Time to bump this thread. The original post in this thread has a ton of links to nothing but discounts on new gear from reputable retailers!
-
Out again today, this time actually seen a few motorcycles out also, cold but still a good ride about 200+ miles or joy with a stop for refreshments before I got home.
https://imgur.com/gallery/1NgQa
Great pics.
FYI, you can easily upload pics here by clicking "add image to post". Then you choose "upload" and then upload the pics right from your pc. The system puts the pic codes right into your post for you and when you click "create post" the pics will go live.
-
Revzilla Sale/Closeout page has a ton of good deals on helmets, boots and jackets. https://www.revzilla.com/sale
-
Just the seat along with your vitals and some photos. Terry will give you a build date for your seat, and put you in the loop, that way you can keep your seat until he needs it. You will enjoy doing business with Terry, that is for sure.
Well, tell Terry that I could help him sell a crapload of those seats. Seriously.
-
Any one close to Florida, it's my transportation, and Washington is as far away from me as get.
It's a mail in ecu service usually a 3-4 day turnaround and they can do next day shipping no probs.
-
No donations as of yet. lol
-
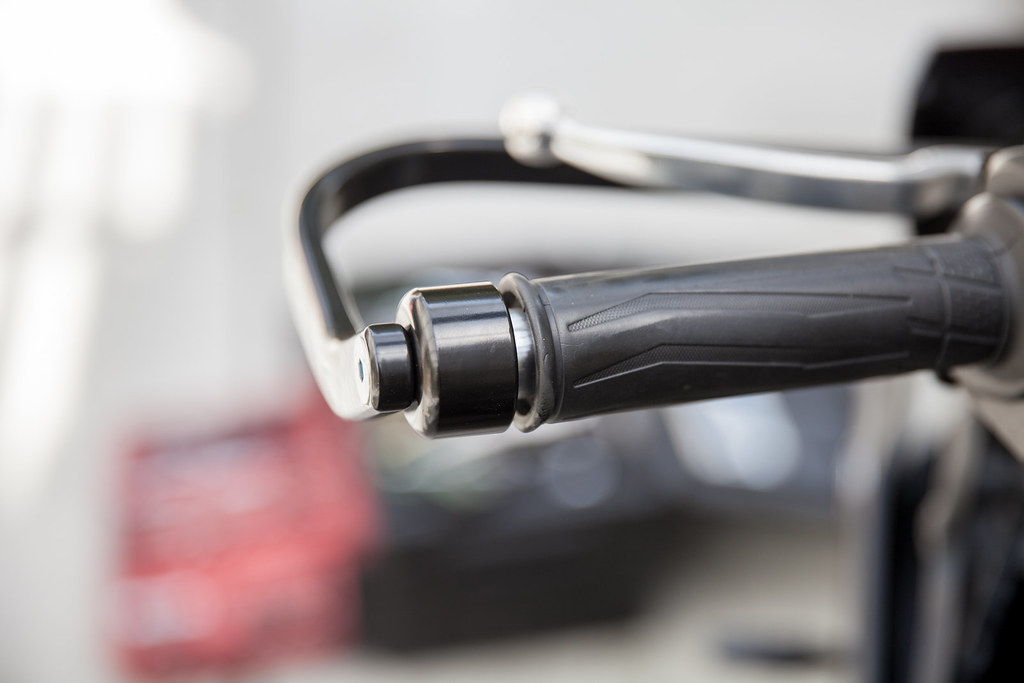
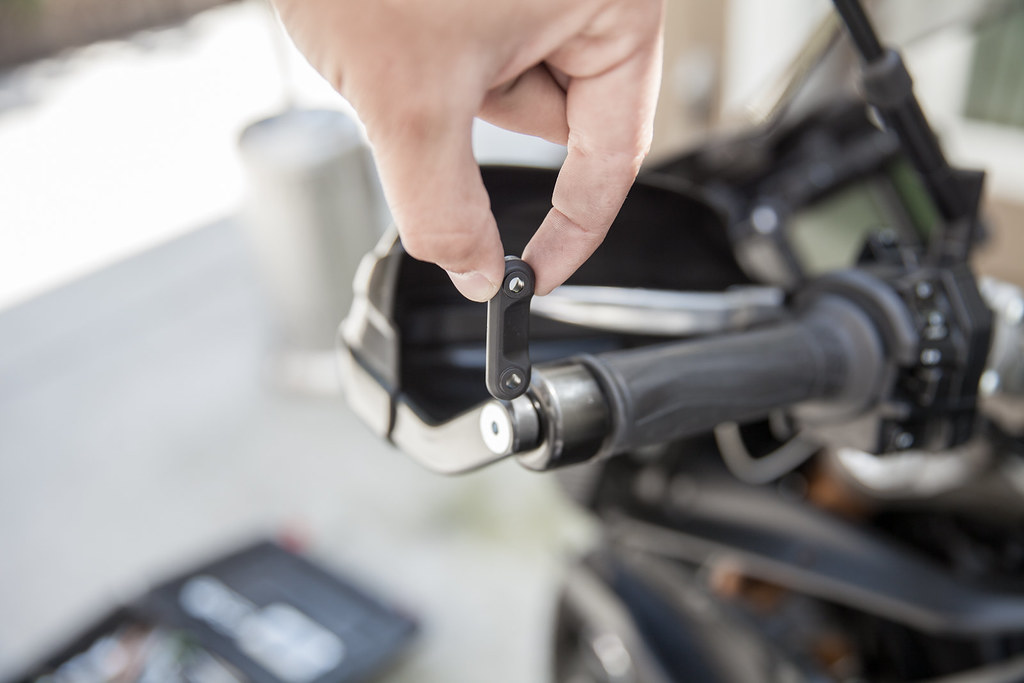
FITTED A PAIR OF GRIP PUPPIES
Unless I really, really concentrate and try hard, and/ or grip the bar-ends very tightly I cannot detect any vibration or buzziness from the handlebars – this bike seems eerily smooth! But fitting Grip Puppies – marketed as being ‘to reduce handlebar vibration’ – definitely helps comfort as they also increase the otherwise-skinny diameter of the ‘bars.
Beware imitations – some inferior and not much cheaper lookalikes pose as ‘Grip Puppies’ or similarly-named items. Often you can almost see through them if they are held up to the light!
Fitting is not quite the ‘simply slide them on’ act suggested, but I have fitted many pairs of these and today’s job took precisely eight ( minutes.
First step is to remove the handguard bracket ends.
Next, plenty of soapy water is needed inside the Puppies and on the handgrips to ease them on – I used a liberal amount of liquid soap.
Gently – if necessary – use a spoon handle or something similar to get the Puppy started over the ridged ‘bar end.
Then, the best way to slide the Puppy onto the grip is to grasp it firmly with a towel and twist the Puppy backwards and forwards while pushing inwards. Don’t be frightened to add more liquid soap + water!
Once on, you can squeeze the Puppy along its length with the towel, which will remove most excess soapy water – the rest will safely dry out on your first and more comfortable ride with the Grip Puppies installed.
Highly recommended!

Wow, this would have made a great tech tip in our tech tip section.
-
Please dont start new question posts in here. This section is for actual "Tech Tips".
Go here to ask tech questions please! https://www.tracer900.net/forum/36-fj-09-tech-questions/ -
Thats why I only partner up with forum vendors that I have researched, vetted and know their reputations well.
-
I had posted in another thread to be careful here. Nels from 2wdw said this T boy software had alot of holes and the tune was not up to par. He had a few other choice words as well that I won't repeat here.
-
Just picked up these Alpinestars SMX-3 Vented on clearance ($167USD)... here. Tried the non-vented on today... very comfortable light duty boot.

That is a good deal on those boots.
-
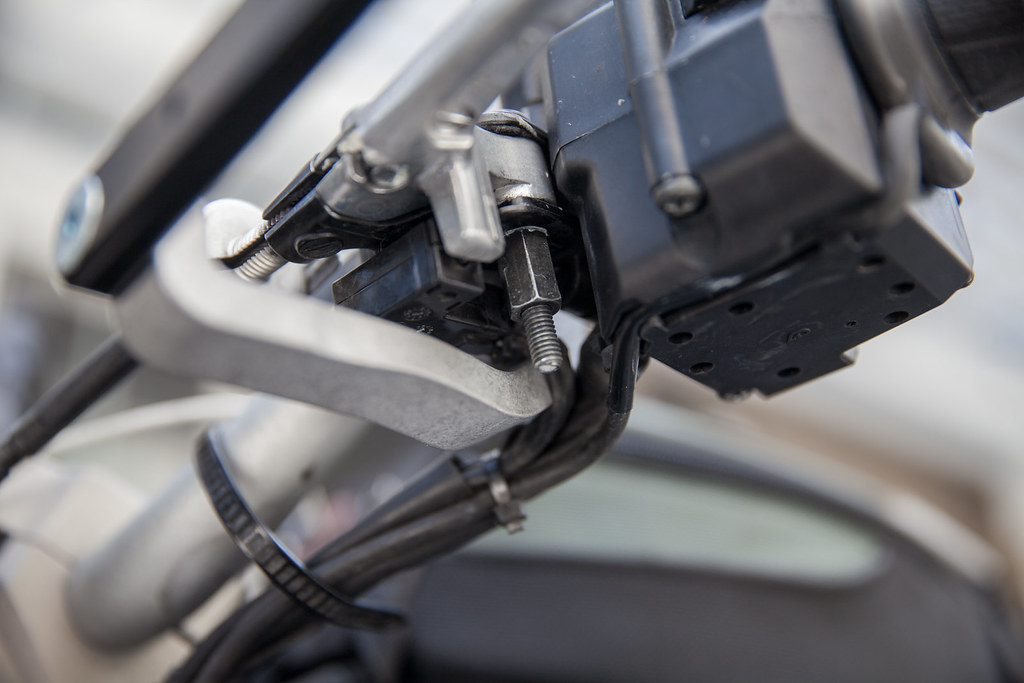
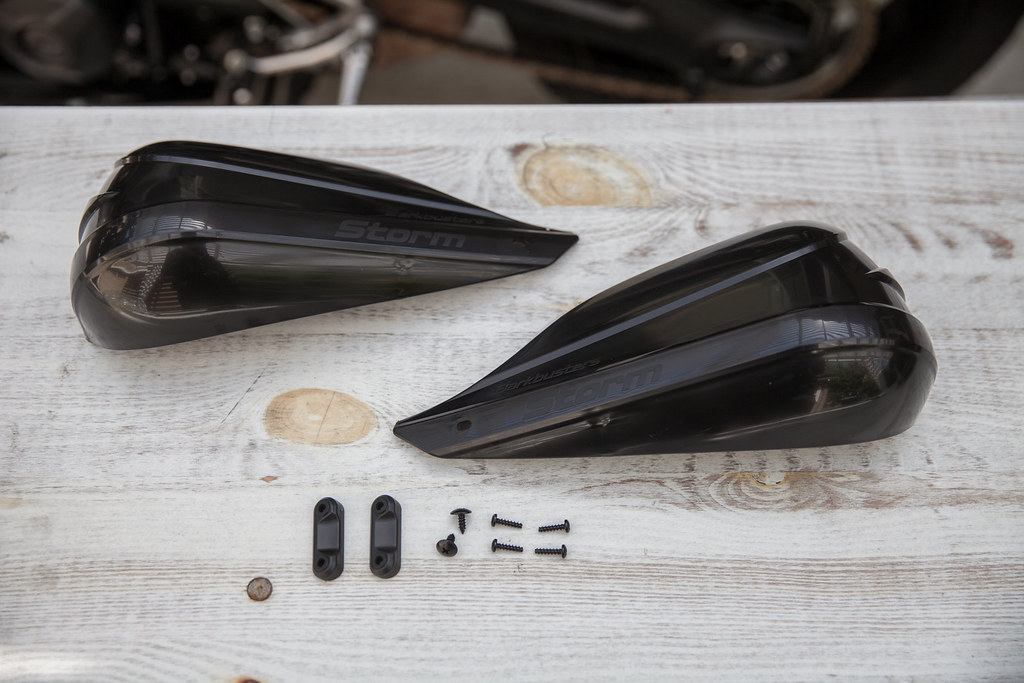
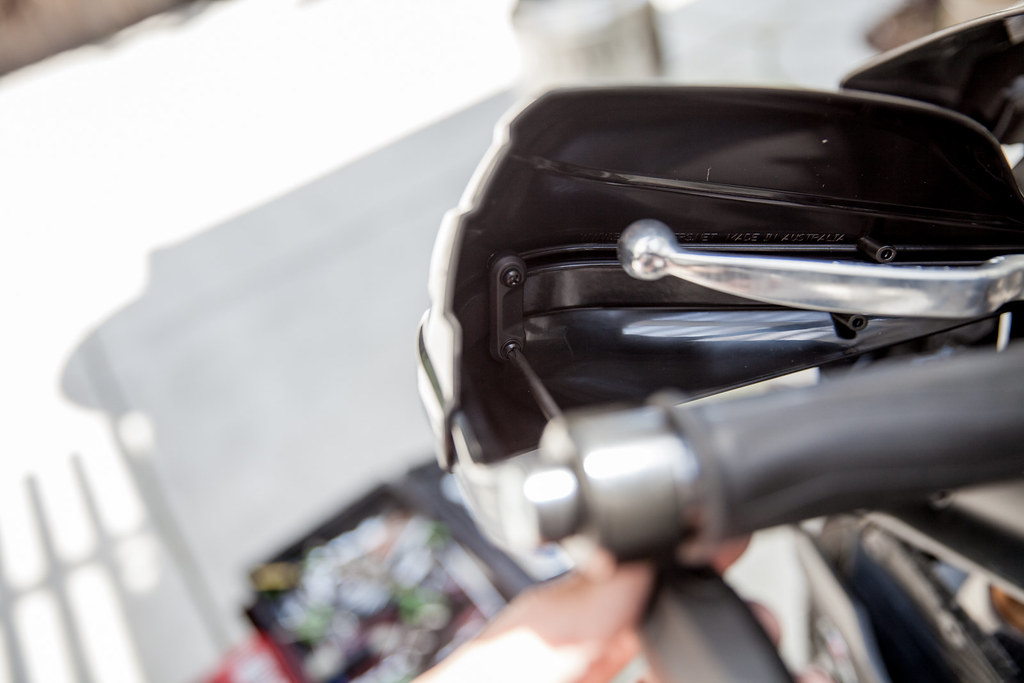
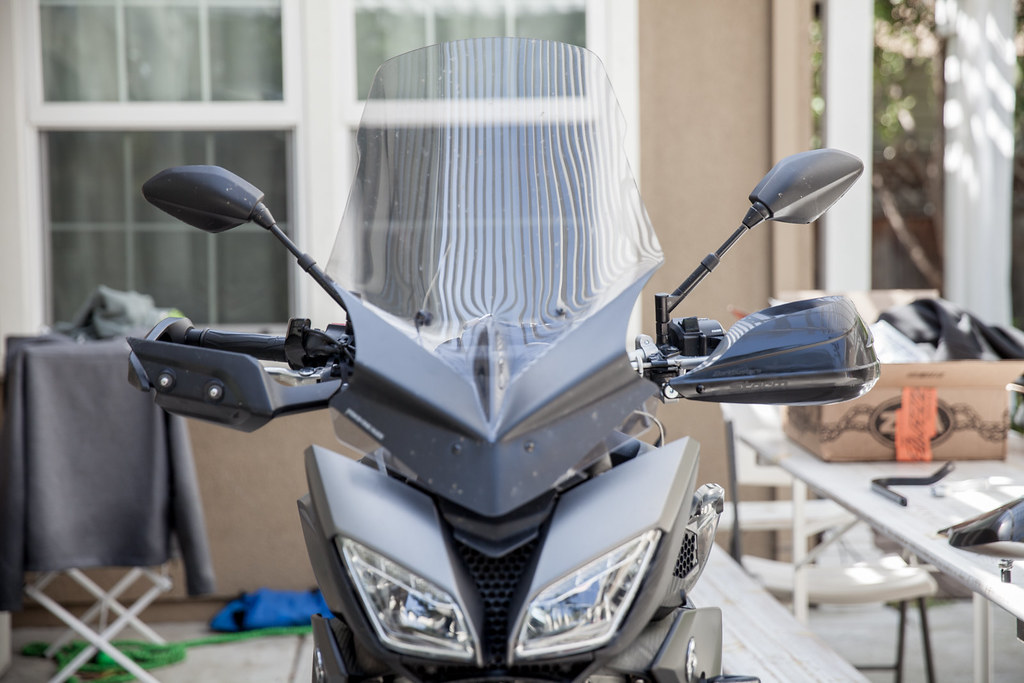
While the FJ-09 isn’t designed to go off-road, I (of course) take it there. The 17″ wheels and low ground clearance means that my pace is slow and the trails are easy, but despite my caution, I had a mild low-side on a trip in AZ last year. Given the design of the bike, it was no surprise that the left hand guard and some plastic bits tore straight off. That’s when I decided I needed some beefier protection. Barkbuster was the first name that came to mind.
After a few thousand miles with these in temps between 32° and 100°; rain and shine, I can definitely say that they offer superior protection from the elements. I haven’t crash-tested them yet, but the peace of mind from their durability over the stock hand guards in addition to their weather-isolation has made this one of the best mods on my bike so far.
[b style=font-size:large]Enter the Barkbuster Storm Hand Guards.[/b]
[b style=font-size:large]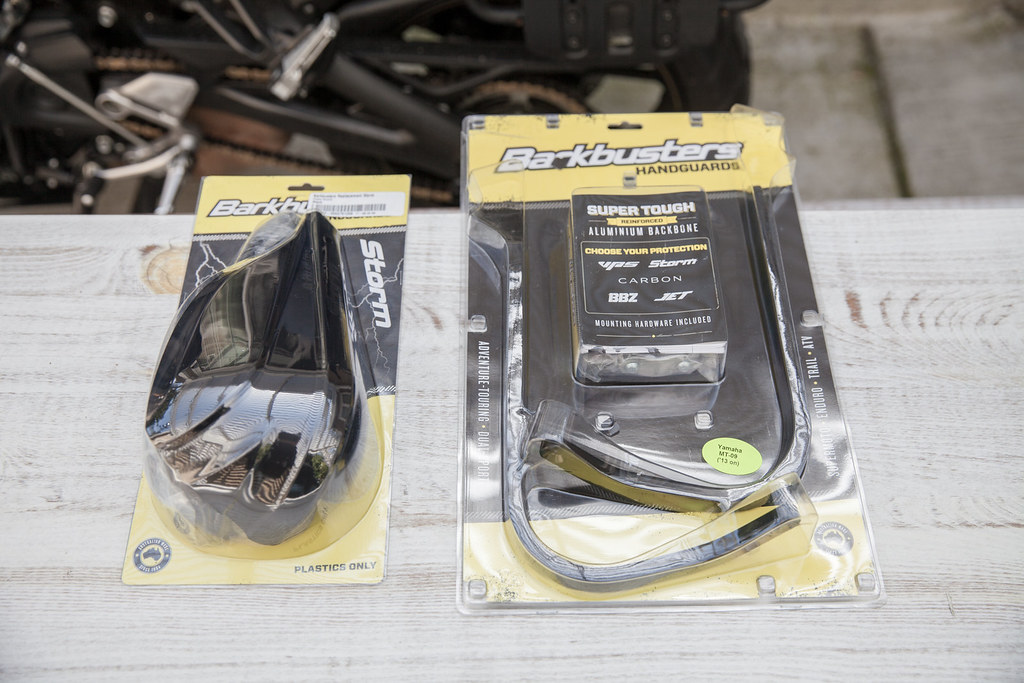 [/b]
[/b]
Barkbuster put together this FJ-09-specific kit which includes everything you need to replace your weak factory plastic hand guards.
The steps are pretty simple:
[ol type=""][*]Remove factory hand guards and threaded inserts
[*]Install Barkbuster threaded inserts
[*]Loosely attach handlebar clamp
[*]Loosely attach backbone to handlebar clamp and threaded insert
[*]Torque to spec
[*]Install handguard plastics
[*]Repeat on opposite side[/ol]
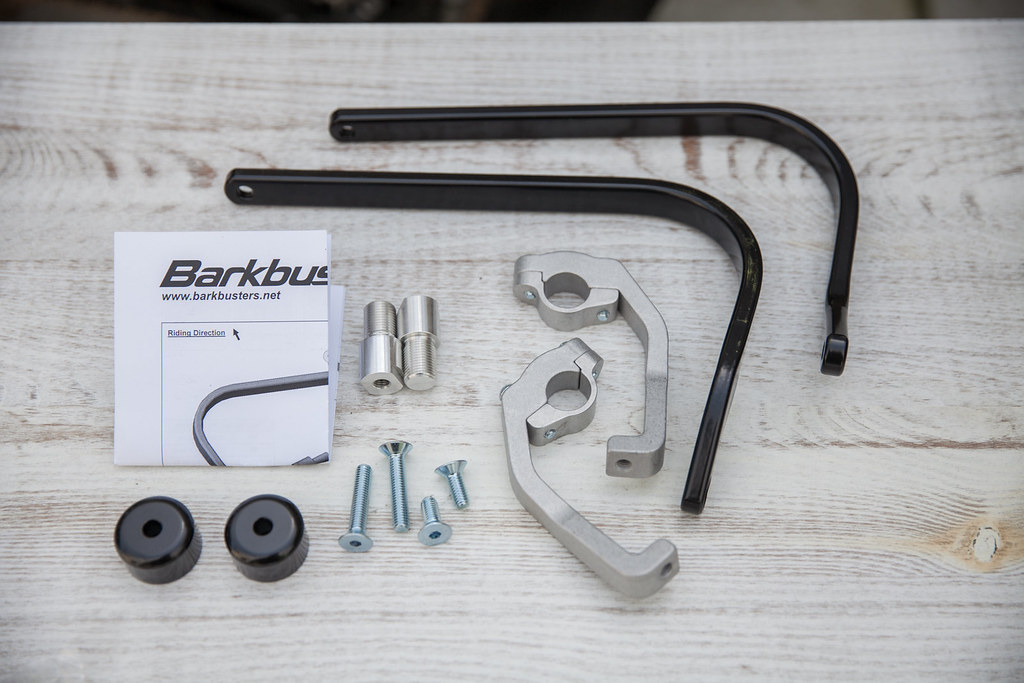
Here are all of the components of the backbone laid out:
[b style=font-size:x-large]Step 1: Removing Factory Hand Guards and Inserts[/b]
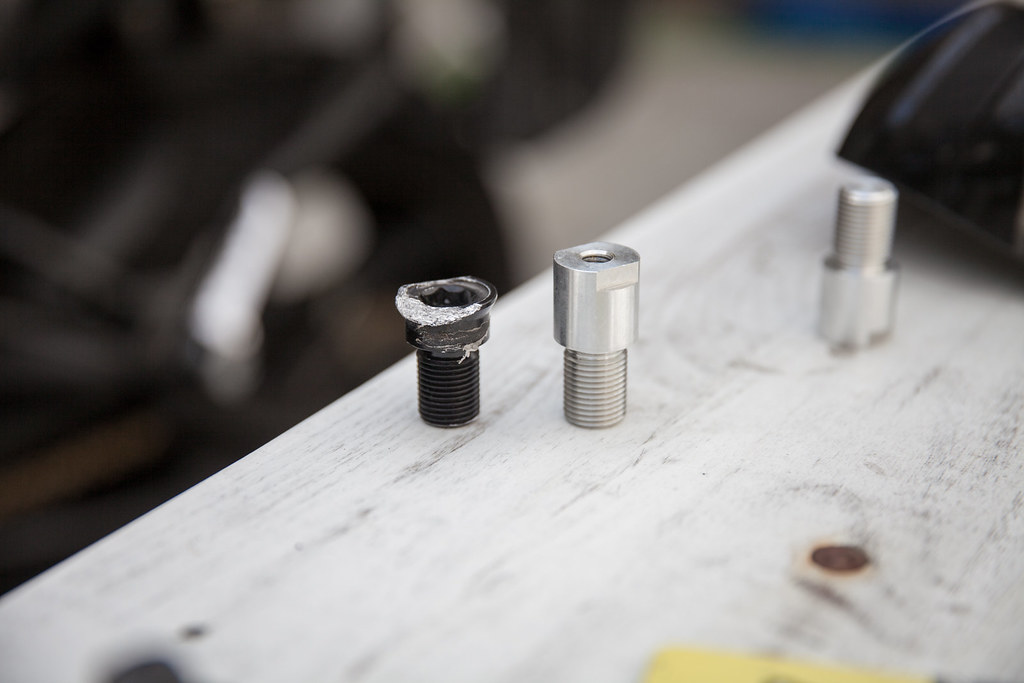
To remove the hand guards, you’ll need to first remove the mirrors and 10mm bolts below the clutch and brake perch holding the hand guard brackets on.
Then, unbolt the allen head bolt from the bar end.
Finally, remove the factory threaded insert using a 12mm hex socket.
Repeat on both sides.

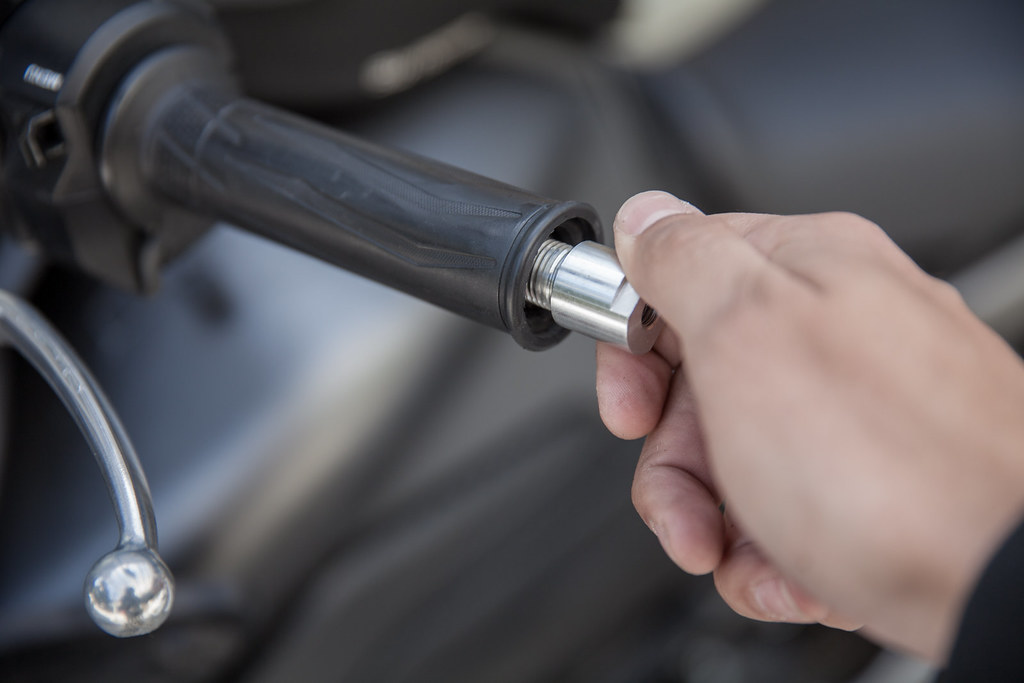
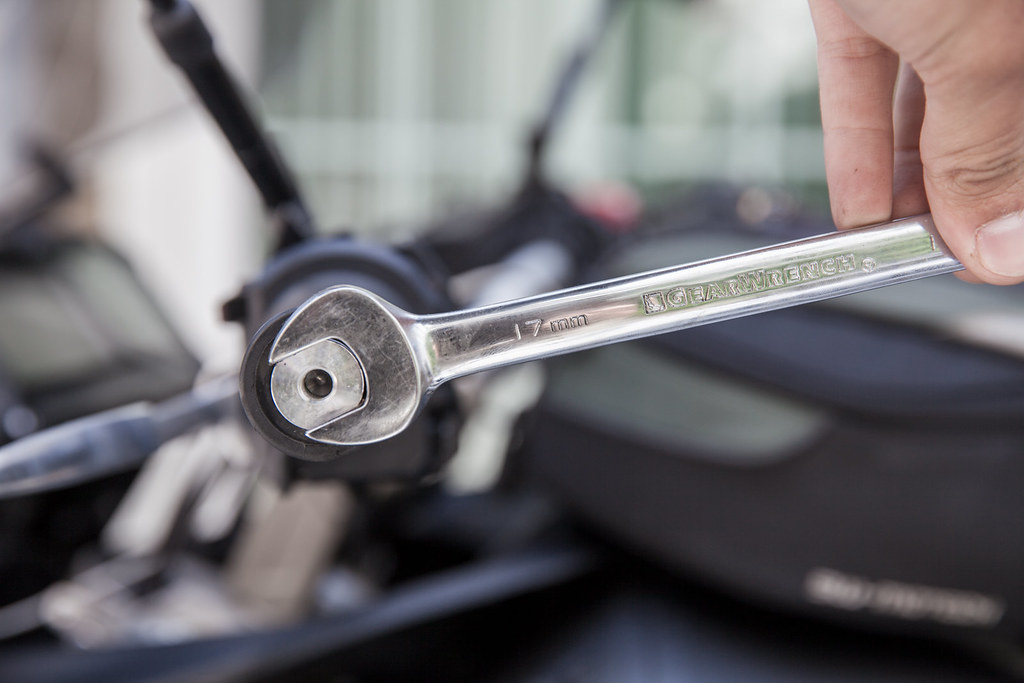
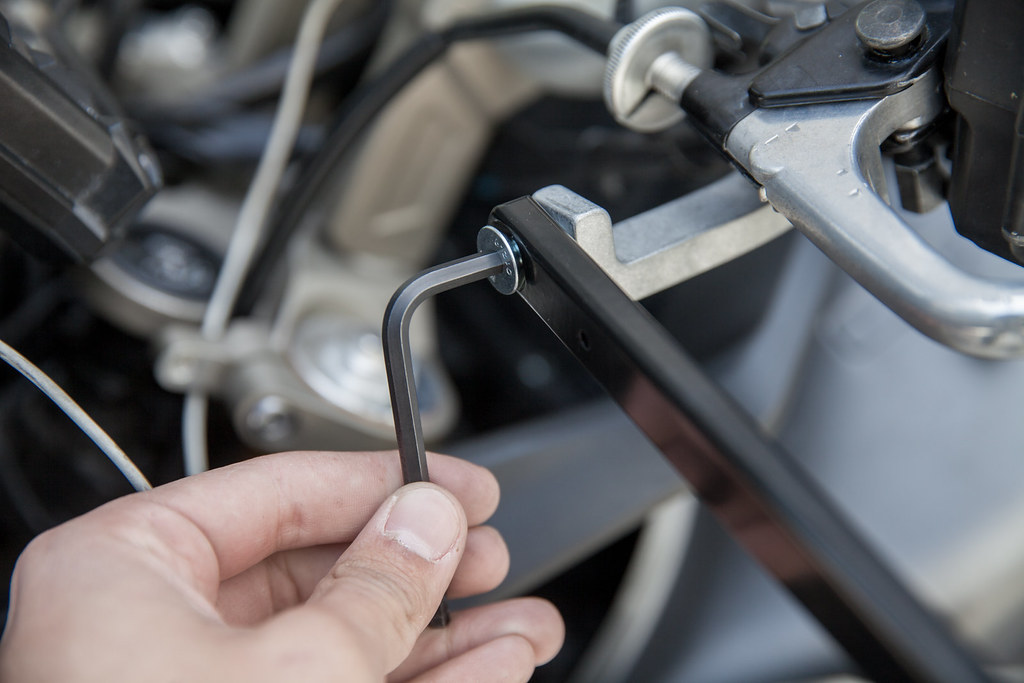
[b style=font-size:x-large]Step 2: Installing the Barkbuster Threaded Insert[/b]
Thread the Barkbuster insert into the bar by hand, then tighten using a 17mm open-end wrench. I torqued this to approximately 25 ft/lb.
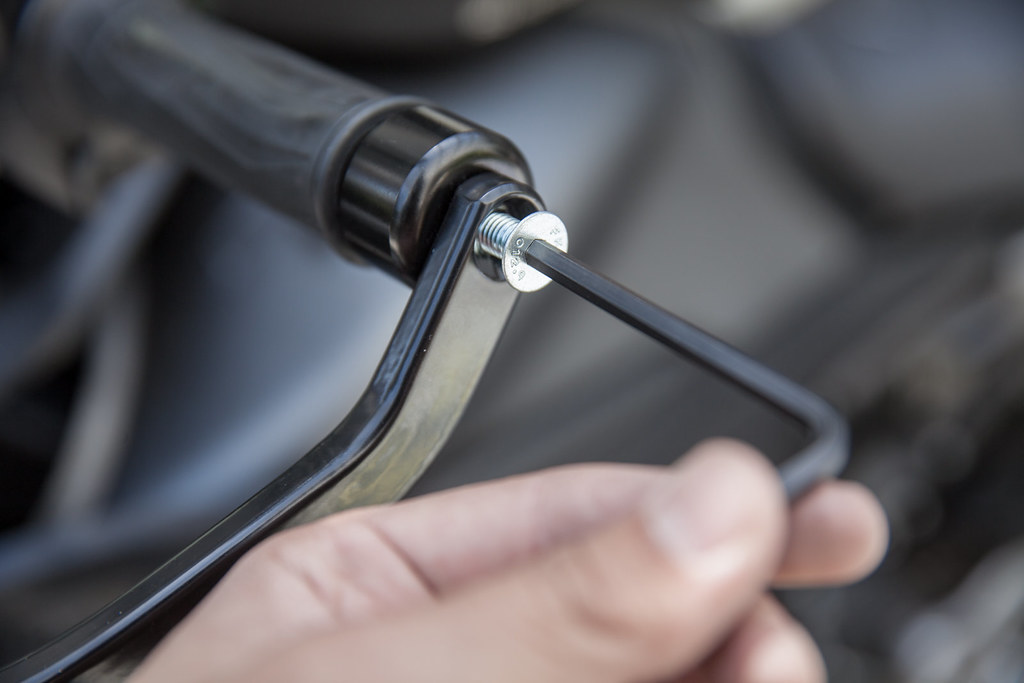
[b style=font-size:x-large]Step 3: Loosely Attach the Handlebar Clamp[/b]
Next, you want to bolt on the clamp that attaches the inside of the backbone to the handlebar.
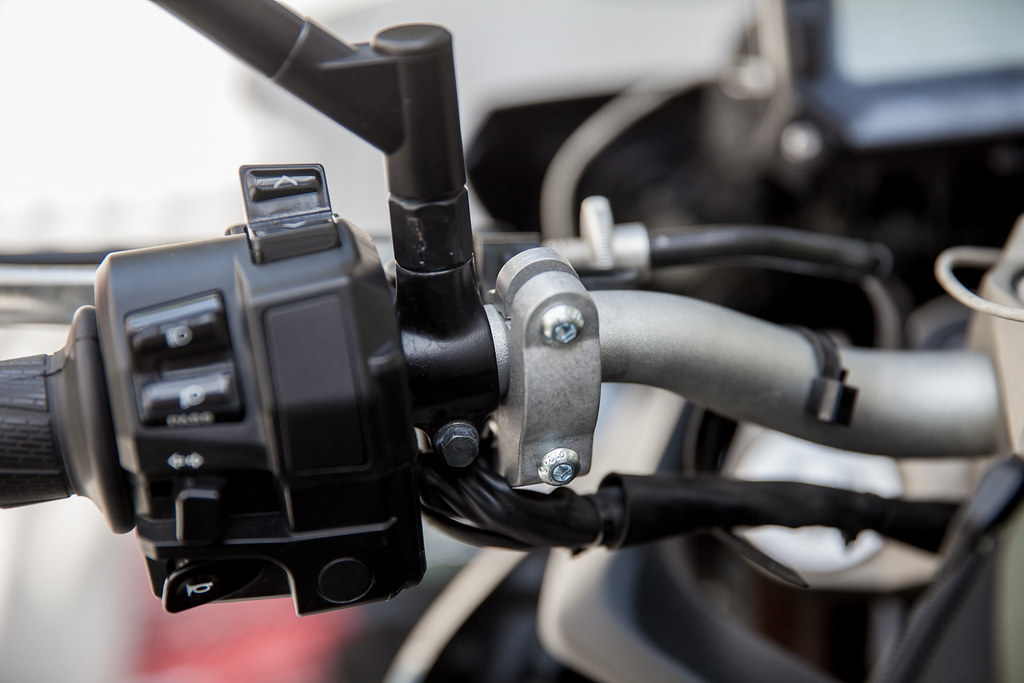
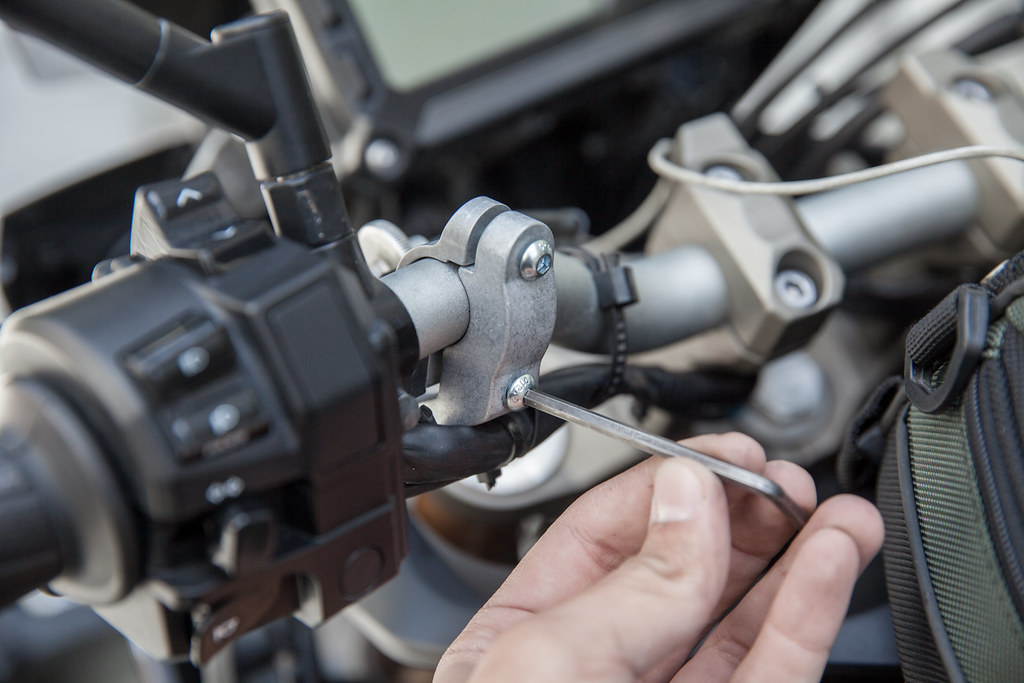
[b style=font-size:x-large]Step 4: Loosely Attach the Hand Guard Backbone[/b]
Now, you want to attach the back bone of the hand guards to 1) the threaded insert in the bar end and 2) the handlebar clamp you just loosely installed.
[b style=font-size:x-large]Step 5: Tighten Everything Down[/b]
Now that the back bone is attached, you can align all the pieces how you want and tighten everything down.

Step 6: Attach the Plastics
With the Barkbuster system, you can attach any plastics to this back bone—Storm, VPS, JET, or their Carbon pieces. I chose the Storm as they offered the best protection against the elements as well as the most subtle styling.
The plastics come with 6 screws and 2 brackets. Each handguard uses one screw on the front and 2 screws to attach the bracket on the back side.
Align the plastics with the hand guard and install the largest screw using a Phillips driver.
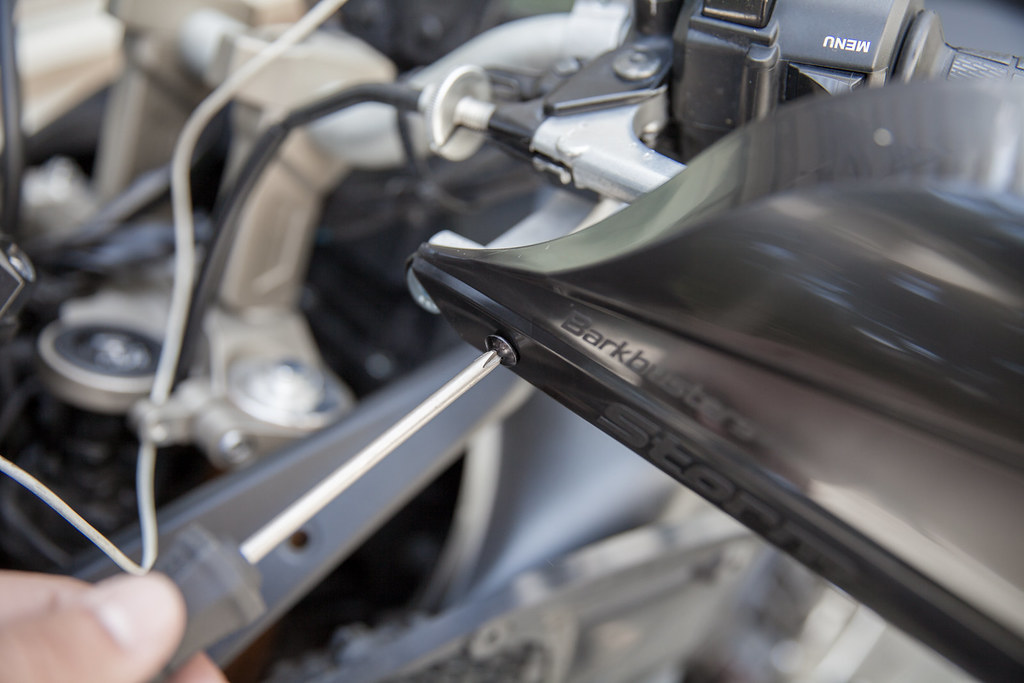
Next line up the bracket on the back side and install its two Phillips screws. This is how the bracket is aligned. If you put it on backwards, it won’t hold the plastics on.
[b style=font-size:x-large]Step 7: Repeat on the Opposite Side
[/b]
Great! You’re done with one side. Rinse and repeat on the other side to complete installation.
Great write up, thanks for taking the time to do that. Tech tips makes life easier for fellow forum members and really, that is why I created this forum in the first place. Great job!
-
 1
1
-
-
I currently have a Scorpion EXO R2000 as my main helmet

It's a great helmet, but not the best helmet for this bike. This is more of a competitor to a Shoei X14, Arai corsair, etc. It vents well and decently quiet if you're in a tucked position, as you would be on a sports bike. It isn't dreadful on our bikes, better than the EXO 1000 I replaced, but not still not ideal.
I really like Scorpion products. I worked for cyclegear for a while, so I've seen some of their stuff. Their customer service is awesome. The EXO R710 would be more like an RF1200, which is a good choice. The inflatable cheek pads seem like a gimmick, but I find it super convenient to perfectly customize the fit. Much easier than swapping cheek pads like you do on a Shoei. That said, the Shoei fit and finish seemed a little nicer. Though I'd expect it to be given the price difference.
Arai helmets are what I lust after after working in the shop, though. Or a high end bell with the transition shield. Shoei also makes a transition shield, if you can get it before it's on backorder.
Awesome helmet! Got a link?
-
Thanks man I'm ordering one of these right now. That's a freaking awesome helmet design. Damn, that's 7 helmets I'll have now in my collection. I have seven in a row hanging on my wall in the man cave!
-
How's the wind noise? Any whistling at speed?Scorpion EXO-AT950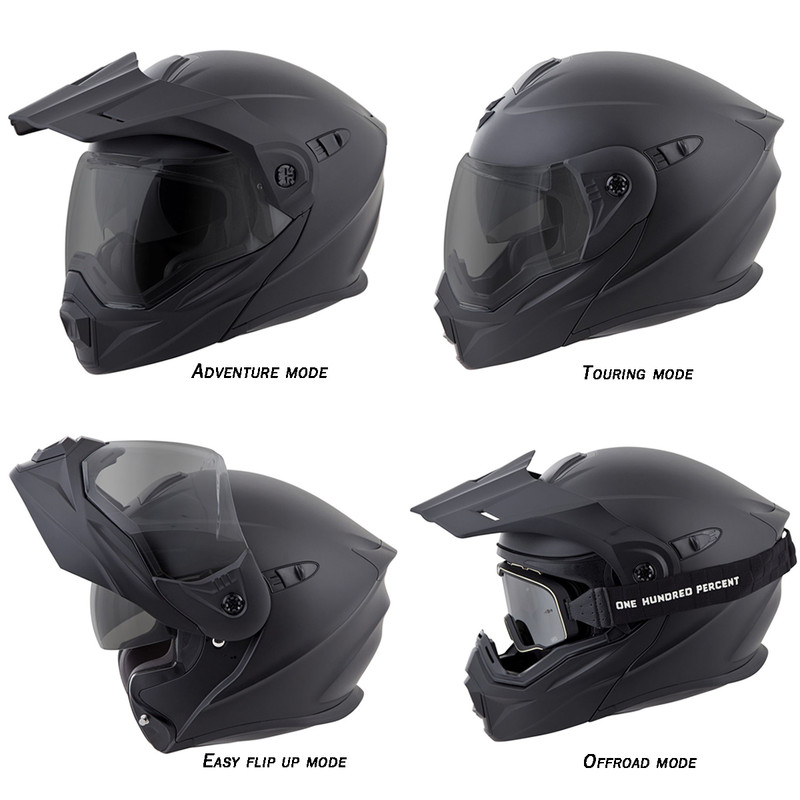
Pics are pretty and all, but anyone got a link so others can check it out? Please and thanks
-
What are the forum rules on posting a hyperlink to my dropbox account for this? I do not wish to do anything that would compromise this forum .Would love a copy of those instructions.
I dunno man, that is inhouse yamaha copyrighted material and they could sue you and probably me for posting that.
-
Cruizin approves of this message! lol
We accept donations via paypal at fj09forums@gmail.com
NOTE: This is not a requirement, but one heck of a good idea if ya can. All proceeds received go to the forum.
-
Seems you've become famous on the interwebsLook at my deer strike at 74mph. 250 ft slide, 50 ft tumble. No engine damage and just a little scratching, that is hardly noticeable. Higdonian cage with skid plate. I also had bar ends that stuck out as far as the OEM brush guards do. They are made of SS and a good 1/2" was removed. Sliders would not have faired as well in my opinion. Sliders work good for drops and minor falls at parking lot speeds.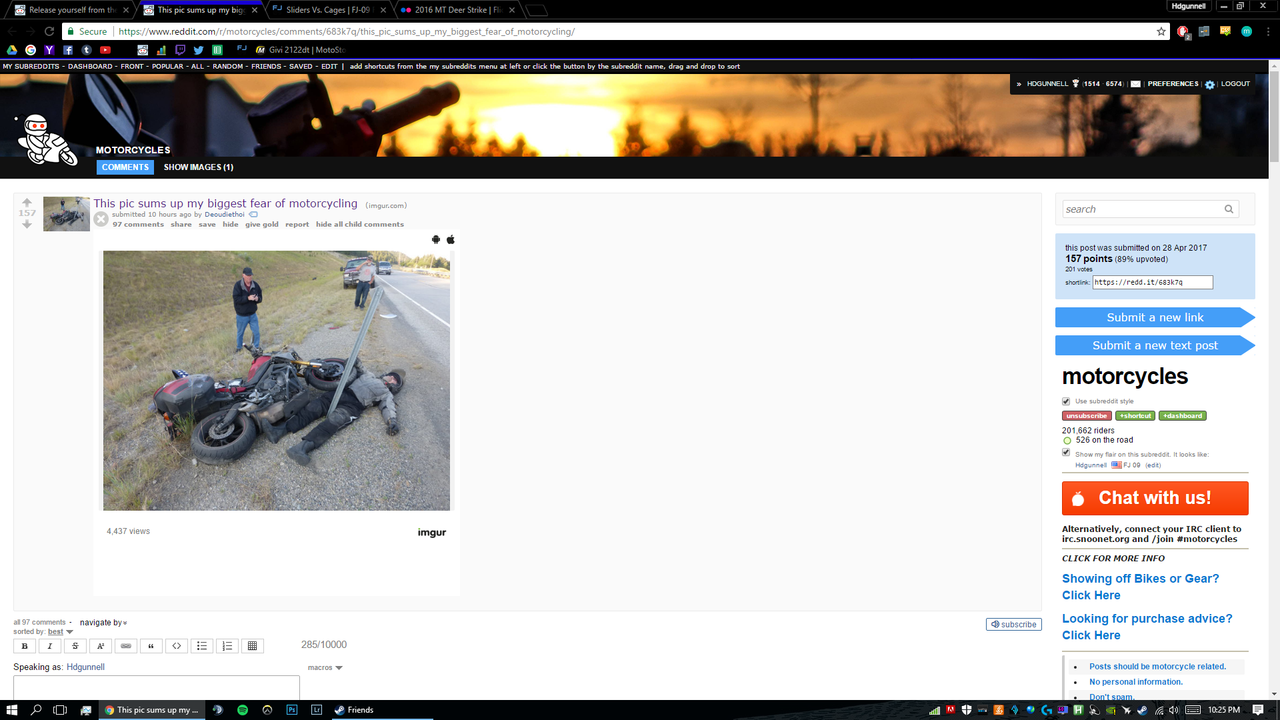
Holy crap! It's trending on Reddit!
-
I wish I could pick one up (Schuberth) but as of last week the only sizes left were Tiny Tim and Jolly Green giant! (Update, only size now is Jolly Green Giant). I did snag a Hi-Viz yellow jacket at half price. Okay, it does say Triumph on it, but what the heck. It's very comfortable and I decided it was time to be as visible as possible, regardless of the "cool factor" or lack thereof. Condolences to Cruzin' on the loss of his friend. That's a terrible shame. You must live somewhere where riding without a helmet is still legal in this day and age?
Yes no helmet is legal here but only Harley guys do it. Hospital confirmed that helmet probably would have saved his life, massive head trauma.
-
I give up

-
 1
1
-
-
Well, I tried to leave a hint about posting actual links so others can get the same deal. Pics are pretty and all, but where did you get these items?


-
I currently have a Dainese Air Frame jacket. It's my only jacket and I use it for three season riding in New England, which is as low as 40 degrees Fahrenheit up to over 100 degrees Fahrenheit. My only complaints with it are the liner uses stupid snap and loops to attach it to the shell and with the liner in, it allows as much breathing as a plastic bag.

Where did yo get it? Did you find a good price that you would be willing to share so others can get one too?
For instance, I wear a KLIM APEX Jacket. You can get em at Revzilla here It's $799 and worth every penny. When the moment comes that I'm flying thru the air. it's the protective jacket that I want to be wearing. It's also the only true waterproof motorcycle jacket that I have ever owned, all others failed me in downpours. Not the Apex though.

For hot 90 degree F plus days I'm about to order a Klim Apex Air jacket. Not quite as protective but still very sturdy . Revzilla Klim Apex Air


Closeout pricing on Helmets boots & jackets, plz add to this
in Gear Reviews
Posted