


foxtrot722
-
Posts
104 -
Joined
-
Last visited
Content Type
Profiles
Forums
Events
Posts posted by foxtrot722
-
-
Congratulations on a great bike, we need to see pictures.
-
 2
2
-
-
Please add any tips or tricks you might have,
2015 - FJ09,
Mirror, Did you know that the right hand mirror stem is left hand threads, found this while installing mirror extensions.
Chain, Did you know the distance between center of 16 pins on your chain is a maximum of 239.3 mm (9.42 in). if it is greater than that, time to replace.
-
 3
3
-
-
On 11/16/2019 at 8:12 AM, 1moreroad said:
Stumbled on it in a post somewhere. Instead of buying a $90 chain tool, I bought a $17 screw on master link. I only need to change my chain every 2 - 3 years, and I only have one bike, so it made sense. You have to know to look for them, but they're on the Sprocket Center website. There aren't a ton of reviews on the internet, but every one I found has been positive up including liter bikes.
I used this Youtube video as a guide (which exactly matches the written instructions. It took about as long to thread the chain on the sprockets as it did to install the link.
I have been ridding since 1968, worked at a Yamaha dealership back in the 70's for a while, never heard of this, very interesting, but I without having some feedback from other that have used the screw type master link, I would be nervous about using. Having ridden only off-road and MX until about 5 years back and seeing the results of the engine cases when the chain wraps around the front sprocket, I'm a little skeptical. Guess I need to purchase one and install on a piece of scrap chain and get a feel for how the compression works when tighten the nuts. I haven’t needed to replace the chain on the FJ yet and was looking at the RK chain tool. Read the reviews on the one Cycle Gear has and felt the RK might be the way to go. I agree with Bugsinteeth, purchasing the highest quality chain is the best investment you can make when it is time to replace the set. When I purchase new MX bikes, I get the highest tensile strength name brand non-oring chain available before ridding the bike and letting the cheap chain start wearing the sprockets. Unbelievable the difference the how many times a cheap chain will need to be adjusted compared the a high tensile one.
-
Just finished installing a set of factory heated grips, wanted the clean install and not need to add any switches. The install was straight forward and looks great when complete. Set the heat control at 3-5-7, haven't gone for a ride yet, will give feed back after the test ride.
-
1
-
-
On 6/11/2019 at 4:32 AM, duhs10 said:
My opinion: The TCS is probably great in low-traction scenarios like rain or dirty roads, but counting on it in serious cornering is a bad idea.
I agree with this too...
I must agree also,
-
1
-
-
On 5/4/2019 at 9:30 AM, ilanr1 said:
Hi , where did you buy these parts ?.
Thanks
Merchant
Interstate Cycle - MotorSport MonsterAddress: 3265 Charlotte Hwy, Mooresville, NC 28117
Phone: (888) 987-6361
parts@interstatecycle.com
704-987-9800When I called a explained the reason for wanting the return the 15 pan screws, part folks were very professional and understanding, are going the wave the restocking fee.
-
47 minutes ago, Duke said:
My biggest concerns with a steel plate are due to the possibility of corrosion die to dissimilar metals, and the possibility of adhesive failure due to the different expansion and contraction rates of steel and aluminum.
Thoughts of using aluminum diamond plate? It comes in at least two thicknesses, one has some structural strength and the other is thinner and is used for decorative decking like on some boat trailer fenders. The thinner one epoxied on would offer some added protection if the pan were bumped by distributing the impact to a wider area. A BIG downside would be if it broke loose from the different expansion and contraction, at highway speeds, hitting the rear tire and just the right angle could be disastrous.
-
20 hours ago, Cruizin said:
Any chance you could redo this post and put it in the tech tip section, so that others can find it over the years and use this as a guide? It would probably help some people save a ton of money
Yes Sir, just completed
-
2
-
-
Posted Tuesday at 05:23 PM (edited)
This is my first time experiencing this problem, but many others have.
My 2015 with the bottom drain plug finely caught up with me. was getting fuel about 200 mile from home, in the pouring rain, misjudged a little step down, bottom of bike just barley touched, just enough to feel, pulled back under fuel pump area and inspect. After about 2 minutes, saw that one little drop of oil. Rented an U-Haul 5X9 trailer and trailered the bike 200 miles to home. So the good part is, caught it as soon as it happened.
Call the dealer where I purchased the bike, spoke with service Manager and explained the bottom drain design error and Yamaha attempted to correct the problem with a redesigned drain that was located on the side.
Taking that into consideration, would he provide a discount on the parts needed to make the repairs.
After getting pricing from local dealer, looks like to me the pricing they offered was retail. based that on a Yamaha Parts web site that was offering parts at a 40 % discount. When I added up the web parts cost and added about 40% to it, it was near what the dealer quoted me.
Needless to say, I was a little miffed that the dealer didn't appear to offer any discount. The next time I am close by, I'll stop in and ask to speak to the Dealer Manager, only fair to let him know they have lost a customer and I won't rely on them for new bike sales, parts, or service.
I was aware of the Mazda mod, but felt consider I ride solo and am cautious about clearance, I could avoid hitting something. Which was not the case. Remember, the bump was so light, I barely felt it.
For those of you that might want to switch to a side drain pan, below is a part list I ordered. The online part number page showed the new part # for the pan and also a new part # for the 15 screws to mount. I was not able to tell if the screws for the new pan was longer or shorter, so I ordered them also.
. .Gasket - These are the crush washers that go on the drain plug
Item #214-11198-01-00 $1.60 3 $4.80
Gasket, Exhaust Pipe - Be sure an order these, crush washers for exhaust headers.
Item #4FM-14613-00-00 $5.15 3 $15.45Element Assy, Oil Cleaner - This is the oil filter
Options: Old Sku: 5GH-13440-50-00
Item #5GH-13440-60-00 $8.08 1 $8.08. .O-Ring - This is the O-ring that goes on the oil level switch located on bottom of pan. One is all that is needed.
Item #5VY-8A8E0-00-00 $4.42 2 $8.84. Plug, Straight Screw - This is the drain plug, not needed, it is included with the Strainer Cover Assy, that we call the oil pan
Item #90340-14132-00 $5.88 1 $5.88Bolt, Hexagon Socket Head - Shame on Yamaha here, when ordering the updated pan, it showed updated part numbers for the 15 bolt that attach the pan, concerned they might be a different length, I ordered a complete set, the only difference is the new one have the heard painted black, I'm returning these.
Options: Old Sku: 91312-06025-00
Item #91317-06025-00 $1.90 15 $28.50Strainer Cover Assy
Options: Old Sku: 1RC-13400-00-00
Item #B56-13400-10-00 $131.45 1 $131.45Gasket, Strainer Cover
Options: Old Sku: 1RC-13414-00-00
Item #BD5-13414-00-00 $11.74 1 $11.74
Subtotal: $214.74
Shipping: $23.49
Salestax: $0.00
Order Total: $238.23Learned a few things during the install,
Parts list,
As you know, there is a revised part # for the pan with the side drain, it also showed a revised part # for the 15 screws that attach it. I purchased just in case there was a length difference. End up the only difference was the color of the head of the screw, it was black, so I'll be returning these.
Also, someone mention that the drain plug was included with the pan, and that was correct.
The pan replacement is fairly straight forward, I did take a few photos of the process. It can be done with bike on side stand if you don't mind laying on the floor for a few hours. I used a couple on exercise mats to lay on.
Picture of new pan.

Center stand needs to be removed, the spring was a bit of a challenge to get off. Used a block of wood to brace up the brake lever and used a screwdriver to remove. The nut for the bolt on the center stand is welded on the back side, so just unscrew the bolt, one on each side.


Removed screws holding wiring harness, was planning to disconnect the plug, but it was not giving up easy, so unscrewed the O2 sensor, there was enough slack in the harness that it didn't twist the wires too much. I used high temp anti seize compound on the threads during the reinstall. Remember to put 5 of 6 twist counterclockwise before reinstalling so you don't end up with twisted wires.

Other than the header bolts, exhaust has two bolts at the rear, one on each side. nut is welded, so just unscrew the bolts. Be sure to replace the 3 crush washers and step torque to 14 foot lbs., way too much work to take a chance on a leak. I used two, 2X4 Boards, one flat and one edge ways under the muffler to support it while removing.

Putting the spring back on the center stand was a challenge also, here is what I came up with that worked, in retrospect, this would have been a better way to remove the spring.

End Product,

Photos of cracked pan,

In the photo below, you can tell the contact was just high enough to give it a bump, Did not strike the leading edge of the deflector

This was posted in the General Discussion section, below are some tips posted by other member, hopefully I can copy the information over so it will give the member credit for their suggestions.
These also work well for springs.
https://shop.advanceautoparts.com/p/performance-tools-brake-spring-pliers-w175/11505733-p
For anyone needing to remove and replace springs, a Spring Puller Tool is worth its weight in gold, it makes it a 2 second job. As a life long 2-Stroke dirt bike rider, I have always had one in my tool box for the expansion chamber springs.
Might add that If you have access to a rear stand you don't need to remove the center stand. The headers only need to be rotated out of the way, which can be done without pulling the cat through the center stand.
When dealing with springs and no spring tool there's the penny trick too. Coins/washers/etc inserted between coils.
This leads to a question, was looking ay skid pans. Anyone have any suggestions?
Higdonion Cages... 2 or 3 different styles of lower cages and an upper cage option... He just released a newer update design also...
The @higdonion model is the way to go. His revised guard is rock solid, gets the job done and looks great. Plus, he supports this forum in many ways.
Link to General Discussion

-
2
-
1
-
-
Learned a few things during the install,
Parts list,
As you know, there is a revised part # for the pan with the side drain, it also showed a revised part # for the 15 screws that attach it. I purchased just in case there was a length difference. End up the only difference was the color of the head of the screw, it was black, so I'll be returning these.
Also, someone mention that the drain plug was included with the pan, and that was correct.
The pan replacement is fairly straight forward, I did take a few photos of the process. It can be done with bike on side stand if you don't mind laying on the floor for a few hours. I used a couple on exercise mats to lay on.
Picture of new pan.

Center stand needs to be removed, the spring was a bit of a challenge to get off. Used a block of wood to brace up the brake lever and used a screwdriver to remove. The nut for the bolt on the center stand is welded on the back side, so just unscrew the bolt, one on each side.


Removed screws holding wiring harness, was planning to disconnect the plug, but it was not giving up easy, so unscrewed the O2 sensor, there was enough slack in the harness that it didn't twist the wires too much. I used high temp anti seize compound on the threads during the reinstall. Remember to put 5 of 6 twist counterclockwise before reinstalling so you don't end up with twisted wires.

Other than the header bolts, exhaust has two bolts at the rear, one on each side. nut is welded, so just unscrew the bolts. Be sure to replace the 3 crush washers and step torque to 14 foot lbs., way too much work to take a chance on a leak.

Putting the spring back on the center stand was a challenge also, here is what I came up with that worked, in retrospect, this would have been a better way to remove the spring.

End Product,

Photos of cracked pan,


-
1
-
 1
1
-
-
I agree with you nhchris, the FJ sits very low and has fragile expose parts. I change the pan today and will post some pictures a little later. The bottom drain should have been a recall. As long as Yamaha has been producing bikes, the bottom drain was extremely poor design. I also agree with GV550, I don't want to add a large cage under the bike, too heavy, reduced ground clearance, and aesthetics.
My first bike was a 1970 DT 250 that I converted to a MX bike, race it a few time and later purchased an 1972 MX 250. Won a lot of trophies back in the day, had a successful amateur racing career for about 6 years. Continued to ride off road after that and didn't purchase a bike with a license plate until a few yeas ago. That was a DR 650 and used as a on road bike, those are bullet proof. So not riding off road like I use to, decide the FJ would be a great bike to used for performance and touring. I guess I need to be more careful with it or switch to a adventure bike.
-
25 minutes ago, estell said:
Has anyone cracked an oil pan after cutting off the fin and installing the Mazda drain plug? I don't recall reading of any. It seems to be a simple and effective mod. No cage needed. I have the mod on my 2015 oil pan.
Take a look here, Cracked Flat Pan
-
1 hour ago, fddriver2 said:
Another nice looking engine guard, thanks for posting, but still leaning toward the Higdonion
-
2
-
-
12 minutes ago, Duke said:
Crud, I suppose I’m going to have to install my Mazda plug at the next oil change, but I really like the one I’m using because it has a built in magnet.
Maybe I’ll splurge and spend money now on a Higdonion to protect my pan rather than spending it later on a new pan. Then I could use my fancy drain plug.
Considering the $160 for the U-Haul trailer rent plus the parts, I agree the Higdonion would be the way to go. I was lucky the wives were not far away and their vehicle has a trailer hitch. If I was 200 miles from home and no one in the area, would have made this more difficult on several levels. Unless I see something better, probably look at getting the Higdonion. The only downside I see is I have forward mounted frame sliders mounted for the sole purpose of having somewhere to rest my legs and feet on a long ride, it really makes a difference.
-
1
-
-
22 minutes ago, chitown said:
Bummer.
Swapped mine before any damage and the only parts needed were the Strainer Cover Assy, and Gasket, Strainer Cover. Pan came with a new drain plug and drain plug gasket. All other parts were reused -- tho I'd have ordered exhaust gaskets as well if I hadn't done this pretty early on.
(11.38 + 131.44) - 5% Time To Ride coupon + tax/shipping from yocracing.com.
I may have missed that the drain plug and gasket was included, if so, I'll have a extra drain plug, ordered 3 drain plug gaskets, I believe it is recommended you replace the gasket each time, however, I have been reusing them for years and haven't had a problem. The biggest thing I learned long years ago was to use a quality torque wrench to tighten the drain plug.
-
51 minutes ago, norcal616 said:
Higdonion Cages... 2 or 3 different styles of lower cages and an upper cage option... He just released a newer update design also...
Thanks, I'll take a look
-
This is my first time experiencing this problem, but many others have.
My 2015 with the bottom drain plug finely caught up with me. was getting fuel about 200 mile from home, in the pouring rain, misjudged a little step down, bottom of bike just barley touched, just enough to feel, pulled back under fuel pump area and inspect. After about 2 minutes, saw that one little drop of oil. Rented an U-Haul 5X9 trailer and trailered the bike 200 miles to home. So the good part is, caught it as soon as it happened.
Call the dealer where I purchased the bike, spoke with service Manager and explained the bottom drain design error and Yamaha attempted to correct the problem with a redesigned drain that was located on the side.
Taking that into consideration, would he provide a discount on the parts needed to make the repairs.
After getting pricing, looks like to me the pricing they offered was retail. based that on a Yamaha Parts web site that was offering parts at a 40 % discount. When I added up the web parts cost and added about 40% to it, it was near what the dealer quoted me.
Needless to say, I was a little miffed that the dealer didn't appear to offer any discount. The next time I am close by, I'll stop in and ask to speak to the Dealer Manager, only fair to let him know they have lost a customer and I won't rely on them for new bike sales, parts, or service.
I was aware of the Mazda mod, but felt consider I ride solo and am cautious about clearance, I could avoid hitting something. Which was not the case. Remember, the bump was so light, I barely felt it.
For those of you that might want to switch to a side drain pan, below is a part list I ordered. The online part number page showed the new part # for the pan and also a new part # for the 15 screws to mount. I was not able to tell if the screws for the new pan was longer or shorter, so I ordered them also.
This leads to a question, was looking a the two skid pans Twisted Throttle offers, just don't really like the look, but not sure if there are any better choices. Anyone have any suggestions?
. .Gasket
Item #214-11198-01-00 $1.60 3 $4.80Gasket, Exhaust Pipe
Item #4FM-14613-00-00 $5.15 3 $15.45Element Assy, Oil Cleaner
Options: Old Sku: 5GH-13440-50-00
Item #5GH-13440-60-00 $8.08 1 $8.08. .O-Ring
Item #5VY-8A8E0-00-00 $4.42 2 $8.84. Plug, Straight Screw
Item #90340-14132-00 $5.88 1 $5.88Bolt, Hexagon Socket Head
Options: Old Sku: 91312-06025-00
Item #91317-06025-00 $1.90 15 $28.50Strainer Cover Assy
Options: Old Sku: 1RC-13400-00-00
Item #B56-13400-10-00 $131.45 1 $131.45Gasket, Strainer Cover
Options: Old Sku: 1RC-13414-00-00
Item #BD5-13414-00-00 $11.74 1 $11.74
Subtotal: $214.74
Shipping: $23.49
Salestax: $0.00
Order Total: $238.23-
1
-
-
I try to always run at least 91, it's usually E10. Stopped by a station the other day and needed about 4 gallons to top off, notice they has 89 E Free. Filled with 4.1 gallons. Trip ahead was about 200 miles of straight road cruising at about 60 MPH. Very few stops, just getting from one place to anther. Took 4 gallons to top off at about 220 miles, so about 55 MPG. That being said, I haven't run the same test using 91-E10 to compare the difference.
-
Only because it is a two stroke! ?
Today, I moved my FJ out of the way so I could load up my YZ and go dirt riding. (That counts right?)

if you have never ridden off-road, Spend a couple of days ridding on a beginners MX track on a MX bike will teach you more about controlling a bike than 50K mile of on road ridding, just my 0.02 cents worth. Just sold my YZ 450F and an back on a YZ 250, 2 smoke.
-
"Yup that's the wear bar. My tires were just a hair less tread than that, but not quite to the wear bar and they wouldn't pass inspection. Techically in order to pass you must have tread good till the next years inspection. Each place has a different interpretation of what a year's worth is. I just got someone who wasn't willing to push the definition."
Guess we are lucky in SC, we don't have MC or vehicle inspections.
-
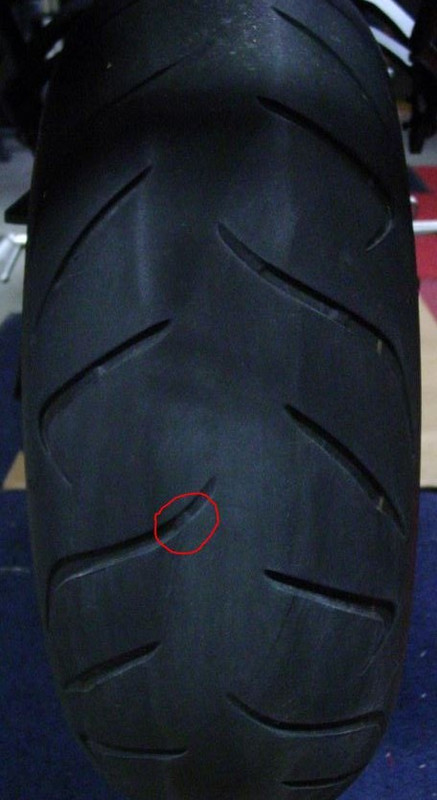
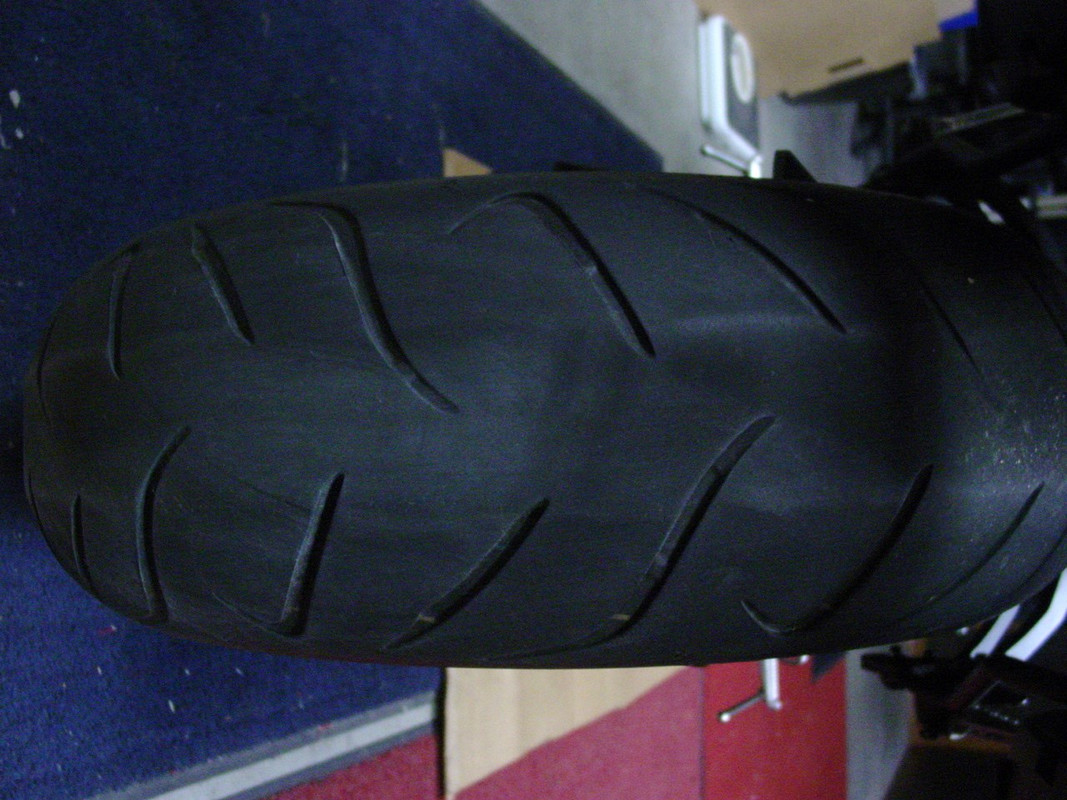
I'll new to the on road world, hard core off road since early 70's, could someone please explain/photo what I need to look for as far as wear bars, as in flush to the tread, I'm at 6K miles even and thinking/hoping it's good for another 1000 milesMy stock lasted 6500 miles before the wear bars were flush with the tread. If I wasn't due for inspection I would have ran them a little longer, but it wouldn't have gained me much. I ended up buying a set of the Michelin Road 5 tires. I'm hoping them serve me well.
Is it the little tab I have circled?
-
Hope I made a wise choice here, Dunlop has a $75.00 rebate if your purchase a pair of tires, Raodsmart III
Been changing MX bike tires old school ( with tire irons) for years, considering no wheel locks or tubes, maybe will be a little easier.
Based on a video, ordered a few tire changing tools also.
Dunlop Roadsmart III Rear Motorcycle Tire 180/55ZR-17 (73W) - Rear - 2015 YAMAHA FJ-09
$169.05
Dunlop Roadsmart III Front Motorcycle Tire 120/70ZR-17 (58W) - Front - 2015 YAMAHA FJ-09
$129.06
Motion Pro BeadPro™ Steel Tire Bead Breaker and Lever Tool Set
$49.49
Motion Pro RimShield II
$13.49
Motion Pro Bead Buddy II Motorcycle Tire Tool
$13.49
This is for knobby tires
Motion Pro Steel Wheel Weights Black
$1.59
K & N Oil Filter Black - 2015 YAMAHA FJ-09
$13.95
[video src=https://www.youtube.com/watch?v=dAKIuSjPXxA]
-
One other note regarding Metzler and Pirelli tires: These are the only makes that I have wore the rubber off to the cords (5X) and through the cords once leaving me having to tow my bike home 150 miles. I once had to replace a tire in Kalispel, MT and it was a Metzler. Metzler tires are made by Pirelli. Here is my last Angel ST at 5300 miles:

Never had that problem with Dunlops, Bridstones, Avons, or Michelins. I always like the performance of the Angel's and the Metzlers, just dislike the quickness they disappears when about 1mm near the wear bars.
The above is way past my comfort level for tire wear, that being said, thoughts on tire life left one this tire, stock with 6K miles on it? Ridden dirt all my life and developing skill for judging wear on street tires.
-
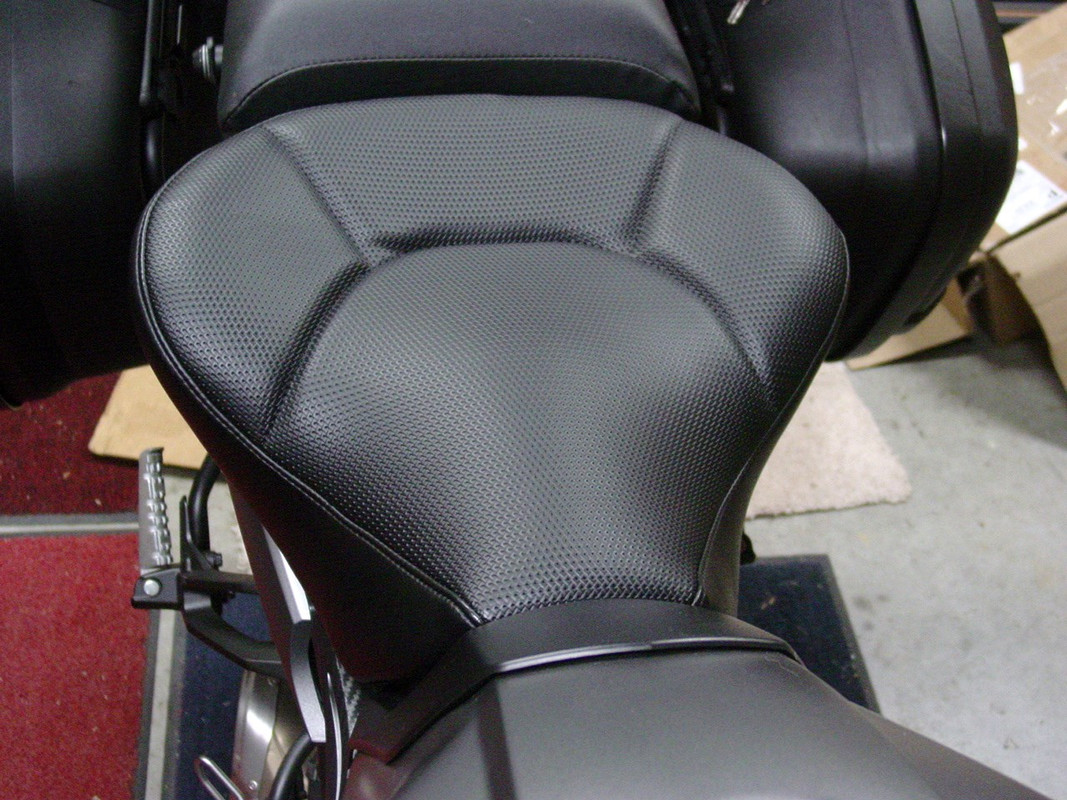
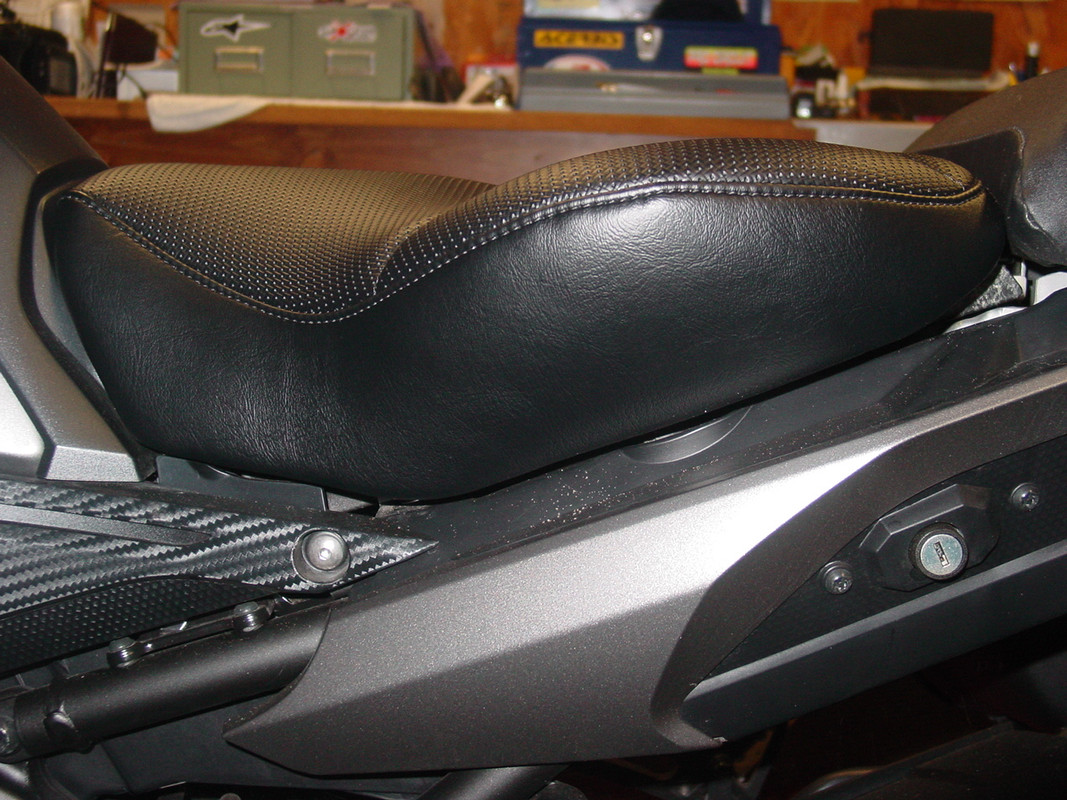
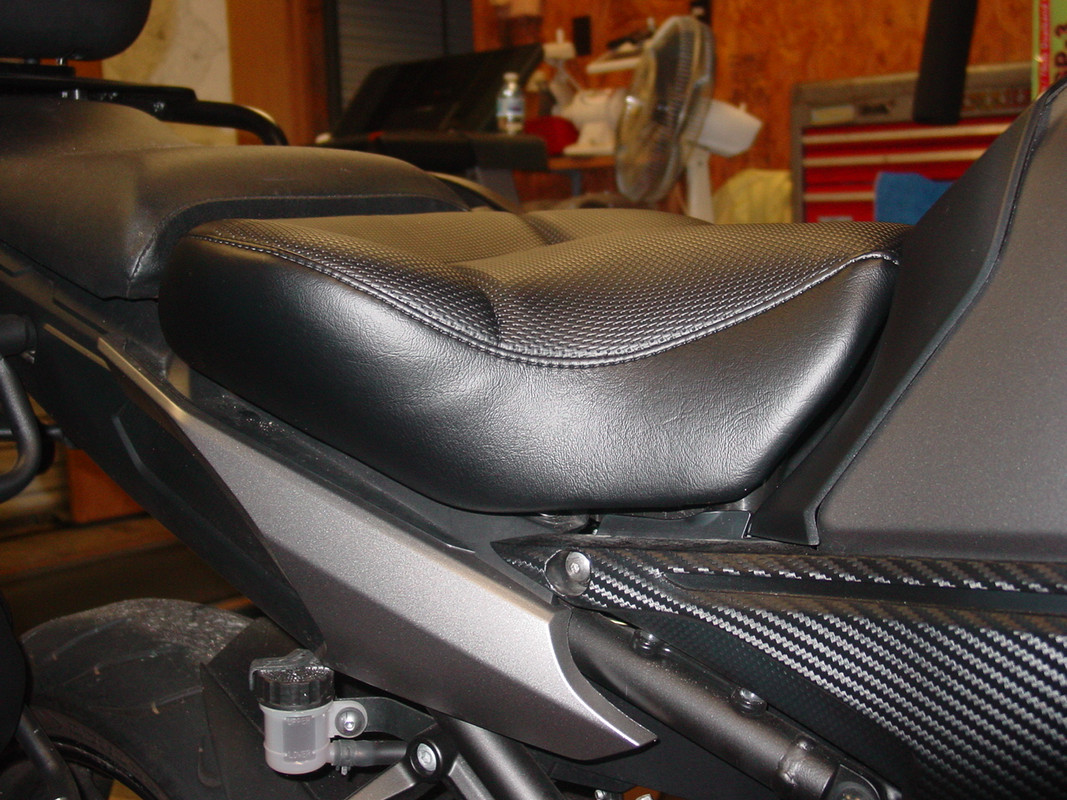
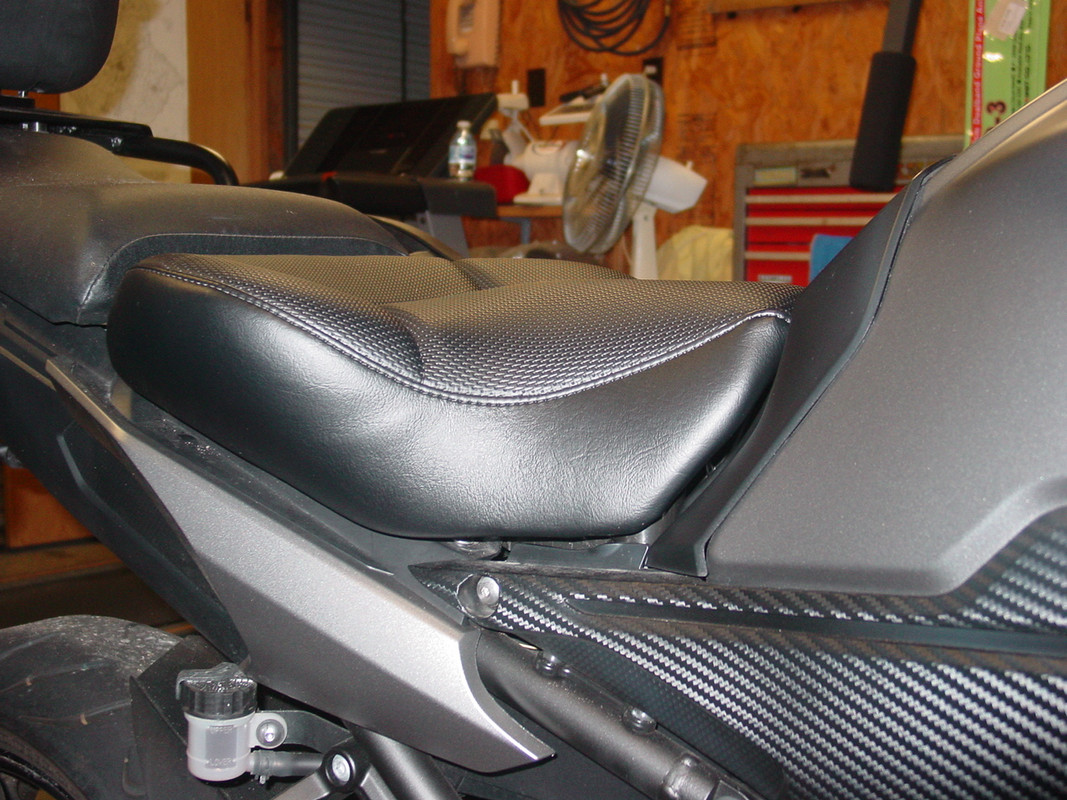
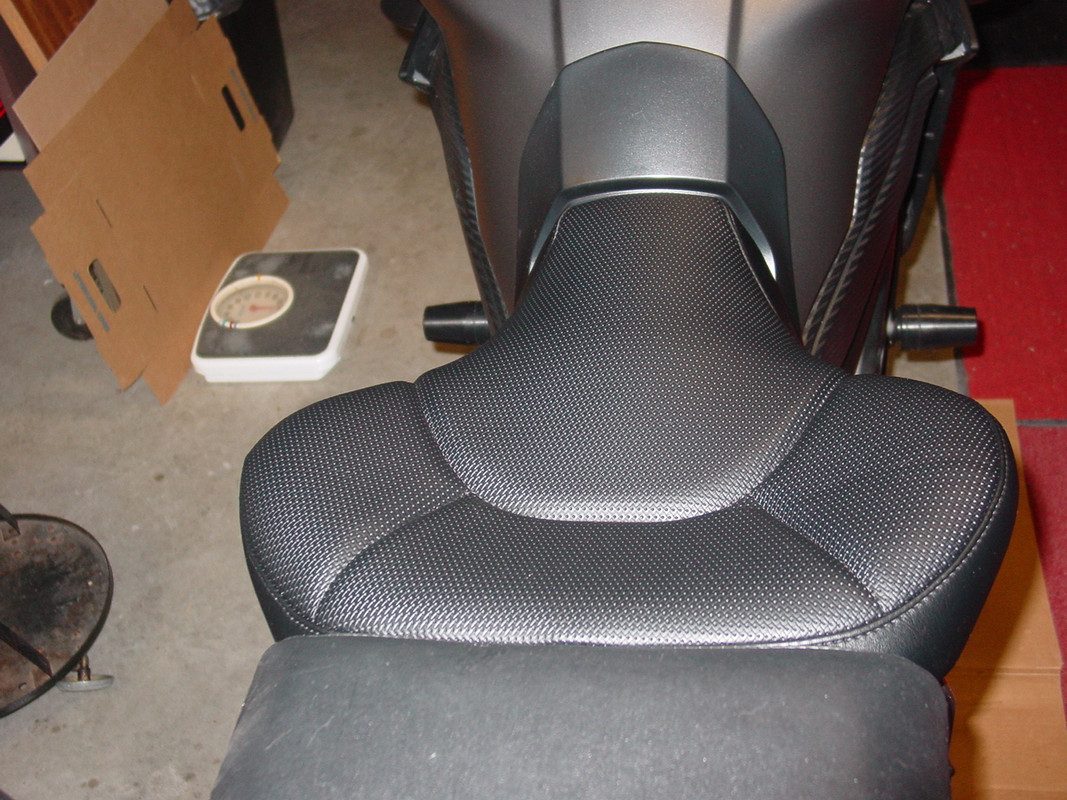
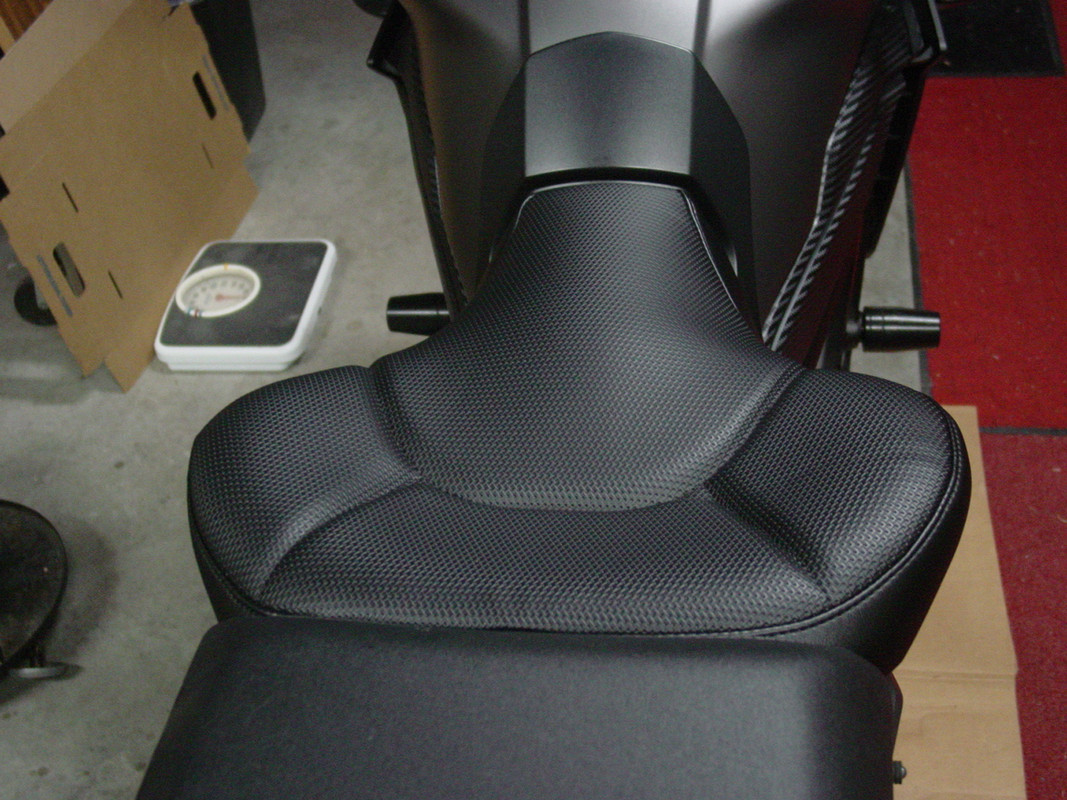
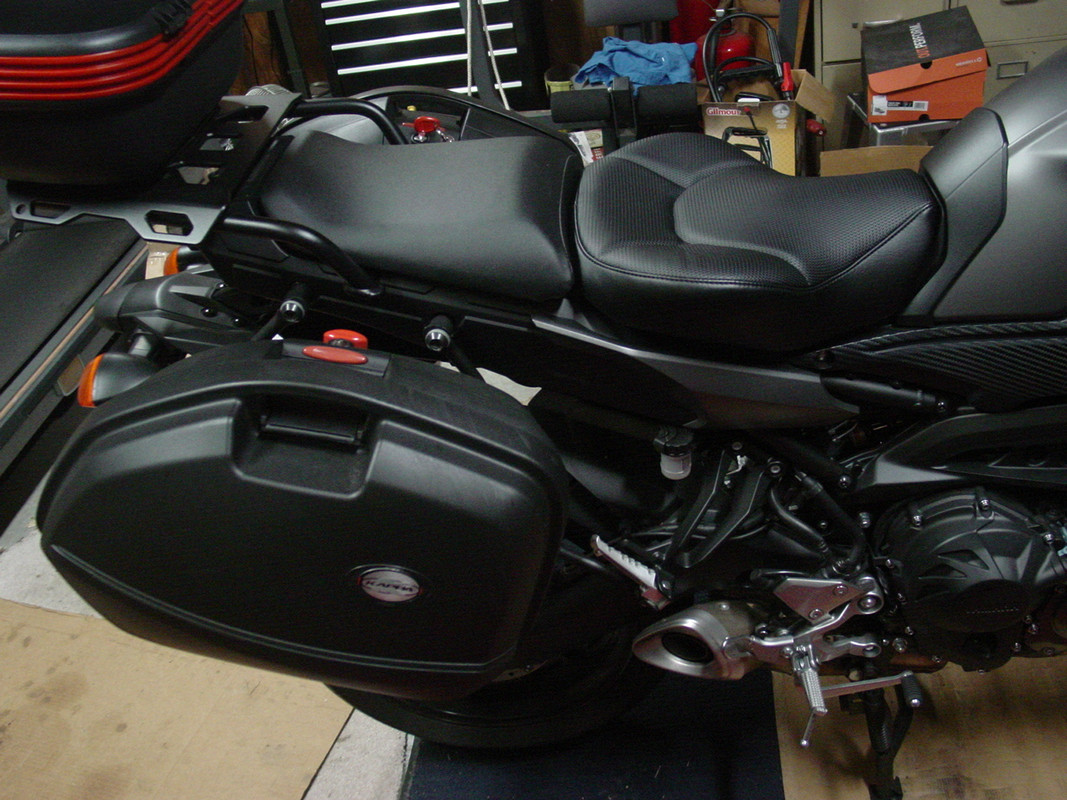
Just received a seat from Terry, he is a pleasure to work with. I don't have a ride report yet, I don't get to ride that often, but when I do, 300 to 350 miles for a day ride or 900 - 1000 mile for a 3 day weekend is what we shoot for


Just picked up my new GT today
in New Member Introductions
Posted
The bike in the pictures is several steps up on the awesome scale, I can't look to long, might have to have one, great setup you have there.